Loading...
Loading...
Loading...
Loading...
Loading...
Loading...
Loading...
Loading...
Loading...
Loading...
Loading...
Loading...
Loading...
Loading...
Loading...
Loading...
Loading...
Loading...
Loading...
Loading...
Loading...
Loading...
Loading...
Loading...
Loading...
Loading...
Loading...
Loading...
Loading...
Loading...
Loading...
Loading...
Loading...
Loading...
Loading...
Loading...
Loading...
Loading...
Loading...
Loading...
Loading...
Loading...
Loading...
Loading...
Loading...
Loading...
Loading...
Loading...
Loading...
Loading...
Loading...
Loading...
Loading...
Loading...
Loading...
Loading...
Loading...
Loading...
Loading...
Loading...
Loading...
Loading...
Loading...
Loading...
Loading...
Loading...
Loading...
Loading...
Loading...
Loading...
Loading...
Loading...
Loading...
Loading...
Loading...
Loading...
Loading...
Loading...
Loading...
Loading...
Loading...
Loading...
Loading...
Loading...
Loading...
Loading...
Loading...
Loading...
Loading...
Loading...
Loading...
Loading...
Loading...
Loading...
Loading...
Loading...
Loading...
Loading...
Sonoran CMS is available on the web, Windows desktop, Mac OS, iOS App Store, and Google Play store! Select your platform below and download the official app today!
Website
iOS App Store
Google Play Store
Windows Desktop
MacOS Desktop
Sonoran CMS manages your community's website, forums, document drive, whitelisting, in-game permissions, and more! Learn more about how Sonoran CMS can be your community's single point of management.
Create powerful automations with your custom community rosters!
Communities can use the panel to send webhooks, in-game messages, and other automated tasks. These actions can run on a schedule or be triggered when roster cells change.
Example: A community roster includes a Status column that automatically switches members between Active and Inactive based on their recent in-game activity. When a member’s playtime drops below the required threshold and their status updates to Inactive, a Discord webhook should be sent automatically.
Note: Activity time columns update automatically when new logs (join/leave game) are created. If a member hasn’t logged in recently, no logs exist to trigger a recalculation, so a 12-hour scheduled task re-processes them.
Sonoran CMS offers dozens of customization options for your community. Check out the configuration options below!
Learn more about creating and assigning ranks, community profiles, and member rosters.
Create and manage custom forms for your community!
Learn more about administrative actions in Sonoran CMS.
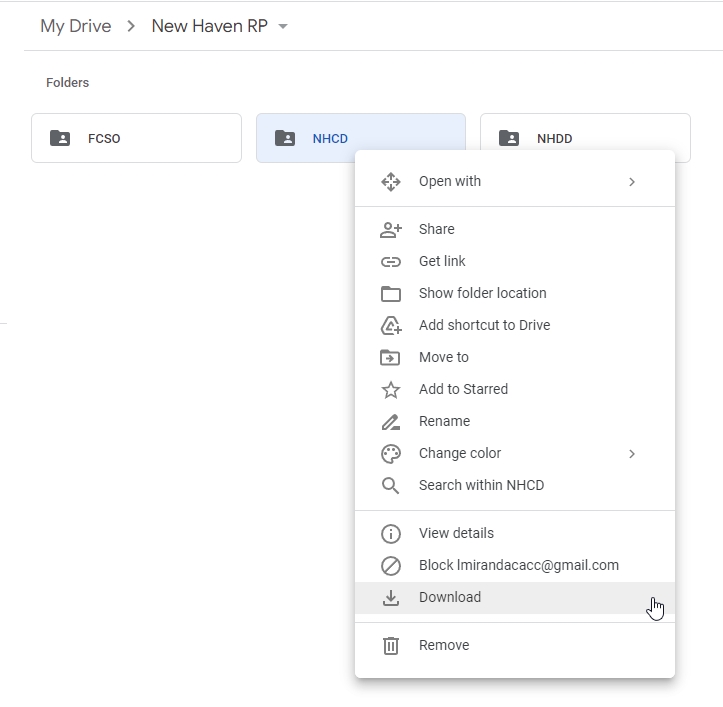
Manage your community's documents, spreadsheets, and presentations natively in the CMS!
Create and live edit documents to share with members based on rank. Sonoran CMS allows you to watermark documents as sensitive, organize files with folders, and more!
Create your own community website, all on your own domain!
Create custom pages with community information, multi-media, announcements, and more!
Sonoran CMS even allows you to add community forums for posts, discussions, and more!
Control your member's access to everything, just by changing a Discord role!
Or, manage Discord roles right through the CMS!
Create fully customizable member applications, forms for tracking, and more!
Whether it's a new member application, promotion request, or ban appeal, Sonoran CMS allows you to customize it all.
AI processing can automatically move forms to various stages based on your requirements.
Each form stage has powerful automations to add/remove permissions, send push notifications, Discord webhooks or DMs, and more!
Sonoran CMS is your single point of management for in-game whitelisting! Automatically whitelist players based on CMS rank for FiveM, Minecraft, Roblox, and more!
Sonoran CMS is the best way to ensure your community stays protected. Prevent banned users from ever applying or joining your community again with advanced alternate account detection. Or, easily filter and find user action logs throughout your CMS platform.
Sonoran CMS manages your entire FiveM server with a dedicated panel for QBCore, Qbox, and menu servers!
Automatically add users to your Sonoran CAD community when you accept their application or manually grant a role!
Remove all the hassle of managing your community's Sonoran CAD permissions. Sonoran CMS is now your single point of management!
Sonoran CMS allows you to easily manage your community's Sonoran CAD permissions based on their Sonoran CMS rank automatically!
Sonoran CMS makes organizing community events easy! Manage member RSVPs, event information, Discord webhooks, and more!
Learn more about accessing and downloading Sonoran CMS on web, desktop, and mobile devices!
It's never been more easy to manage your gaming community, regardless of your platform!
Only Sonoran CMS supports full i18n localization. Regardless of your community's native language, Sonoran CMS supports it! Sonoran CMS translations are made possible by our community contributors! Anyone is allowed to contribute to our GitHub translation files.
As shown in our changelog, new features, fixes, and suggestions are added all the time!
When a form is moved to a new stage a roster cell can be automatically updated.
Coming soon!
In certain cases, antivirus programs such as ESET are known to block connections to the CMS. To add CMS to ESET's allow list, please follow the following instructions:
Open ESET program on your computer
Press the F5 key to open Advanced setup.
Click Web access protection. Expand URL list management and click Edit next to Address list
Select List of allowed addresses and click Edit
Click Add in the Edit list window. Paste *sonorancms.com* in the respective field, click OK → OK to save your changes, and exit the Advanced setup window.
If using CAD, also add *.sonorancad.com*
For more information, see .
The Sonoran CMS Gallery System completely replaces the need for any other gallery application for your community!
The Sonoran CMS Gallery System is a custom page element allowing you to create and organize your gallery(s) to fit the needs of your community. Easily add Gallery Categories to any custom page, create or use existing categories across multiple pages. Each category has the ability to manage permissions to Upload, with more coming soon.
To create a Gallery Category navigate to the Website Builder located at Administrative Panel > Website Builder
Easily manage in-game vehicles with the CMS VMenu management panel!
Easily whitelist or deny users from accessing your server based on their CMS ranks!
Automatically sync your CMS Ranks to TeamSpeak Groups


Server Uptime
CPU Usage
Memory Usage


Select the Start button to start an in-game resource.
Select the Stop button to start an in-game resource.
Select the Ensure button to start an in-game resource.


Managing your community with Sonoran CMS is easy! Let's help you get started...
Easily manage in-game players with the CMS VMenu management panel!
Click on any online player to interact.
Copy unique identifiers
Warn the player in-game
Kick the player from the server
Selecting Warn on a player will prompt you to add a reason message. The player will then receive a warning notice in-game, requiring them to hold down SPACE for ten seconds to dismiss.
Learn more about the ER:LC game panel's features!
Coming soon!
Docs overhaul coming soon.
TODO
Filters
Sort Order
Search
Sonoran CMS's robust API system comes complete with several already developed integration resources. Learn more about our already developer integration resources!
Track member statuses, connection time, ranks, identifiers, and more with custom community rosters!
In-depth logging of all user actions in your CMS help keep your community safe from bad actors!

Build your fully featured community website, for FREE!
Community Name
Community Tagline
Community Logo
Community Banner
Community Description
Once you've filled out the information, press Create to create your CMS Community. Your community icon will now be displayed under the My Communities section. You can click on this to log into your new CMS Community.
Now that you added a Gallery section you can select from existing Gallery Categories or create a new one. If you're looking to create a category, simply click the green CREATE button. This will display a popup with various inputs, fill in the category label and select the permission preferences that apply. Once the category fits the needs that you like click the orange outline SAVE button.
Once you have saved the Custom Page you can now view the page with the Gallery element added.
To create a gallery post simply click "Upload New Photo" and this will display a gallery post creation dialog. Fill in the appropriate information for the post you're wanting to create. Once the post information suffices your needs simply click the green SUBMIT button to create the post. Once it's created it'll automatically add it to the gallery view.
Register your account with Sonoran CMS to easily create a new community, or join an existing one.
On the website or app, select your Login method.
When viewing a specific community, they may have .
Enter in your email, username, and password. Then, select the Register button.
Account verification emails may not be shown in your primary inbox.
If you're having trouble finding the email, check your spam, junk, promotions, or all mail folder.
Check your inbox for an email from Sonoran CMS. Select the Verify Email button, and your account will be automatically verified.
Looking to view a member's profile that's within your community? Follow this page for more information!
There are a few ways to view a community profile, which are listed below.
From Administrative Panel > User Accounts, you can right click on any user, then select View Member Profile.
You can also click on any user's account avatar to be redirected to their profile. This can be done from the User Accounts page when viewed as a grid, from the Edit Account Information popup, as well as from form submissions, forum posts, and any other places where a user's avatar may be displayed.
Profile fields can be customized in the admin panel, and communities can control who is allowed to view or edit these fields for both their own profiles and those of other users.
Easily view user permissions and determine what ranks are granting or denying permissions.
When configuring a rank, each permission can be set to Grant, Unset, or Deny:
Grant — Explicitly gives the permission to anyone with that rank.
Unset — Neither grants nor denies the permission; it simply leaves it unchanged.
Deny — Blocks the permission, even if another rank would otherwise grant it. A denied permission always overrides a grant.
Use Deny sparingly. It’s best suited for special ranks that must override other granted permissions, such as a temporary ban rank. In most cases, leaving a permission Unset is sufficient, as it will not grant the permission on its own.
You can view a user’s computed permissions directly in the account portal. Click the (?) icon above their ranks to see every permission that’s granted, unset, or denied. Hover over any permission to see a tooltip listing the groups and ranks responsible for granting or denying it.
Configure rank promotion flows for your community members.
Promotion flows let you easily promote or demote members within your community.
For example, a user with the Rookie rank can be promoted to Member, or an Administrator can be demoted to Moderator.
Access the Promotions Panel In the Promotions panel, select Promotion Flows to view, add, edit, or remove existing promotion flows.
Set Up the Flow Header Use the Promote From and Promote To fields to label the flow. Example: Promote from Moderator to Admin.
Configure Rank Changes
When a promotion flow is ran, you can also run automated actions like a Discord webhook, push notification, and more.
This feature is coming soon!
In the Run Promotions panel, select the user(s), choose the promotion flow, and specify whether to promote or demote.
Use the green “+” icon to add additional rows, allowing you to run multiple promotional flows simultaneously.
Communities can !
Track performance with in-depth community metrics.
The leaderboard at the top of the growth panel displays your global rankings compared to other CMS communities.
These placements are used to , helping to drive new users to your community!
The metrics panel offers historical metrics and performance graphs for your community. This allows administrators to easily track their community's growth, decline, or stagnation.
New Members
Number of new members joining the community
Lost Members
Number of members that left the community
Looking to remove your Sonoran Software account?
You can access your Sonoran Software account by going to account.sonoransoftware.com, or by selecting "Profile" in the side menu then "Edit Account" on the next page.
On the Sonoran Account website, select Account > Advanced > Delete Account
This will send an email confirmation to the address on file.
Check your email for an account removal request and click the "Remove Account" button. Having trouble seeing it? Be sure to check your spam/junk folder.
Looking to archive a member of your community from your Sonoran CMS?
You must have the Archive User permission or the Community Owner in order to archive another individual, the same checks are applied as kick and bans.
Archiving a community member keeps the member within the community in a "Archived" state. They're technically kicked from the community which won't allow them to log into the community till they've rejoined. While a user is "Archived" you're still able to view their Community Profile and edit information on that user.
To archive a member head over to the Administrative Panel > User Accounts. Once you've located the member you'd like to archive, click their row which will provide you with a editing dialog.
Below their account name and to the right of the "Kick" and "Ban" options, there should be a grey Archive button, if you have permission. Click that button and it will ask you to confirm that you want to archive this user.
Additionally you're given the option to choose whether their rank and identifiers get removed or if they stay on the account. If rank(s) are not removed from their account upon archiving it does not mean they still have permission or can do anything additional, it's simply for organization.
To unarchive a member head over to the Administrative Panel > User Accounts and click the drop down in the top left to filter user accounts. You'll want to change this to the "ARCHIVED" option. This will now display all Archived members.
Once you've located the archived member, click their row which will provide you with a dialog.
Choose whether or not if their rank(s) and identifier(s) should be removed and confirm the unarchiving.
Easily manage in-game jobs with the CMS QB Core management panel!
Click any job to expand the contained grades/ranks.
Select the + symbol to add a new grade and the pencil icon to edit a job type.
You can adjust the grade name, pay, toggle it as boss, and reorder via drag-and-drop.
You can create a new job type by selecting New Job at the end of the job list.
Expand it to edit the job information and add grades.
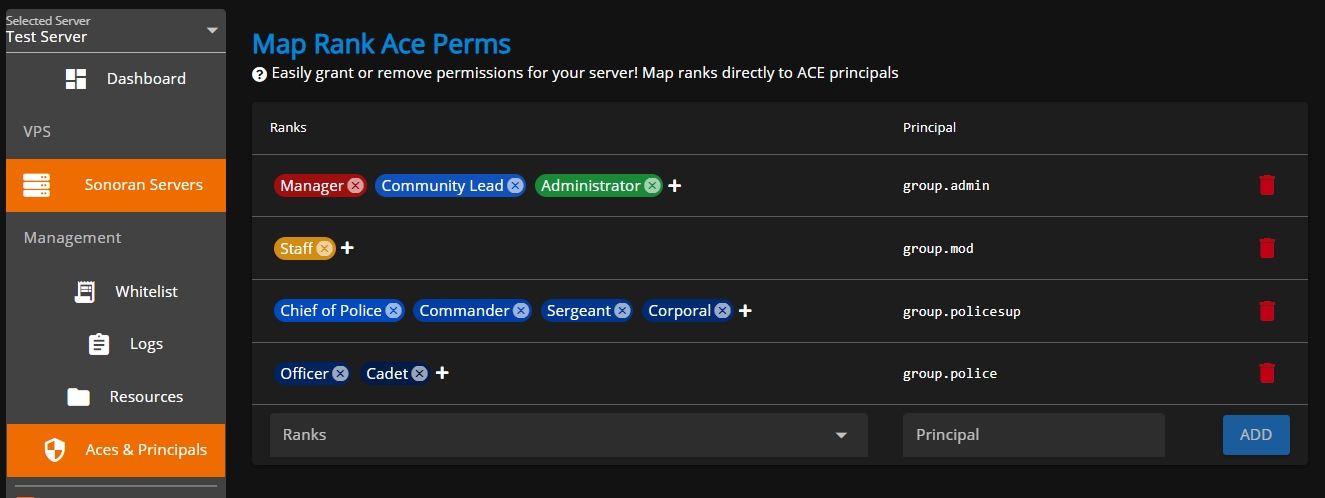
Easily grant ACE Permissions to users directly from CMS.
Ensure you have the following in your server.cfg (if you don't permissions won't be able to be granted)
add_ace resource.sonorancms command allowYou can select the ranks you would like and input the principal identifier you would like to grant them. This makes it easy to grant users in-game permissions en masse.
You can further customize the permissions each Principal group receives in your server.cfg, make sure to follow the conventions outlined in .
Additionally, ensure all players have added their to the CMS.
For more details, read our documentation on the "Ace Permission Sync" module for CMS Core .
Configure automated actions when community members receive disciplinary points.
The Sonoran CMS disciplinary panel makes handling misbehaving members easy!
This panel allows you manage disciplinary "points" to a user when they break the rules, misbehave, etc. Additionally, you can configure automated actions like sending the user an email, Discord message, modifying their ranks, banning them from the community, etc.
Many communities may wish to have points expire after a certain length of time.
In the configuration tab, you can enable or disable point expiration and set the length of time.
You can also configure automated actions that apply to users once they meet specific point levels.
In this example, once a user receives 1 or more points they will receive a Discord DM message.
Disciplinary points will be displayed on a member's avatar for anyone that has access to the disciplinary panel.
Use the search bar to filter to a specific community member.
Select the user to view all active points or remove them.
To add points to a member press the green + icon.
Use the popup dialog to select the account, amount of points, and a description.
Communities can also that add disciplinary points.
You can specify a Member Selector field on the form for someone to report a community member.
Additionally, a Number field on the form can also be utilized to add a custom amount of points to a user.
Easily manage in-game gangs with the CMS QB Core management panel!
Click any gang to expand the contained grades/ranks.
Select the + symbol to add a new grade and the pencil icon to edit a job type.
You can toggle a grade as boss and reorder them via drag-and-drop.
You can create a new gang type by selecting New Gang at the end of the gang list.
Expand it to edit the gang information and add grades.
Manage your FiveM server with the CMS QBCore, QBox, and vMenu game panels!
Run ER:LC commands from the CMS management panel.
Select Run Command on the panel to open up the ER:LC command palette. Here, you can select a command, player(s), enter additional information, and execute the command.
Some commands have two states (e.g., Jail/Unjail, Admin/Unadmin). Simply click the command badge again to toggle between states.
The Kick and Ban command will create a corresponding player record when used.
ER:LC commands can be ran via using /erlc command.
Some specific commands can be ran entirely .
Easily whitelist or deny users from accessing your server based on their CMS ranks!
Here you can select ranks to either allow or deny them on the whitelist for the server you've selected.
Within either list, each department shows as a sub-menu allowing you to toggle the ranks you wish to be added to this list.
Configure CMS to manage your ER:LC server in minutes!
The ER:LC game panel is currently available as an early-access proof of concept and is not intended for production use. We’re rolling out weekly updates to expand its features ahead of the full release.
Setting up the ER:LC management panel is easy! Learn more below:
Learn more about each of the ER:LC panel's features using the guides below:
Configure moderation standards in the ER:LC panel.
The Priority Player List highlights in-game users with specific CMS ranks by moving them to the top of the player list. This is useful for quickly identifying which staff members (or other ranks) are currently online.
Players with one of the configured CMS ranks will display a rank badge on their player card and appear at the top of the dashboard list.
Even with Roblox’s built-in username moderation, some inappropriate names can still bypass filters. The Username Moderation panel allows you to automatically kick users with “All” or “Others” in their username — preventing commands targeting them from affecting the entire server.
You can also configure AI-based moderation standards to automatically detect and handle inappropriate usernames.
In-depth logging of all user actions in your CMS help keep your community safe from bad actors!
This guide covers the next steps after receiving free Sonoran CMS resource installation with your Sonoran Servers Windows Server or Expert Installation.
Grant CMS ranks based on your current in-game job!
Select the rank(s) which you would like to associate with a given job in-game on the left box, then select the job in the right box.
When a player has the job in-game, they will be granted the associated CMS ranks. This allows you to restrict permissions for Sonoran CAD, Radio, etc. to specific character jobs only.
Click ADD
Easily set the weather and time in your server, directly from CMS!
The CMS Core comes with default submodules that handle a variety of features!
These submodules are included when you download and install the regular resource. They can be found in the server/modules folder.
The ER:LC whitelist panel enables social, server, team, vehicle, and livery restrictions.
Easily set the weather and time in your server, directly from CMS!


In the Ranks to Add section, select Admin.
In the Ranks to Remove section, select Moderator.
Run the Promotion Flow When executed, this flow will add the Admin rank and remove the Moderator rank, effectively promoting the user.


Select the Start button to start an in-game resource.
Select the Stop button to start an in-game resource.
Select the Ensure button to start an in-game resource.
Active Members
Unique user visitors per day
Form Submissions
Number of new form submissions on each custom form
Website Views
Number of unique visitors per day on each custom webpage
Discovery
Number of unique views and clicks from the community discovery system
URL Shortener
Number of visits to each link from the URL shortener


While having a custom form with the form type of "Patrol Log" you can utilize the "Patrol Start/End" column type which will allow you to import clock in/out times straight into the form.
Using the Clock In/Out feature is easy as clicking the "Clock In" button, doing this will clock you in, giving you the option to clock out after the 60s or cancel the clock in entirely.
Once the "Clock Out" button is available to be used and when you're ready to clock out all you need to do is click the "Clock Out" button.
You can also add timestamped notes while clocked in to briefly describe what you were doing.
To view or create Clock In Notes, open the Clock In/Out Component and click the "Clocked in Notes" button to open it. Here you can type in a new note you would like to add regarding your current shift.
When you're satisfied with your note, press enter to add it to your shift.
You can view your entire Clock In/Out history through your community profile located on the left side menu. You can also download any shift's data as a .txt file or view Clock In Notes by clicking the buttons on the right.
Copy the Unique ID of the identity that you use to connect to your server (almost certainly the first one)
If your Unique ID isn't shown, click Show Advanced on the bottom of the identities popup
Open your Community Settings by using your profile dropdown on the top-left of your screen
Paste your UID into the TeamSpeak UID input in the popup
If the TeamSpeak section isn't shown, then that means your community hasn't setup TeamSpeak integration correctly
Make sure you are connected to your server's TeamSpeak, then click Save TeamSpeak UID
You should receive a message in TeamSpeak containing a code, paste the code into the new popup on CMS and click OK to verify that the TeamSpeak UID belongs to you
Navigate to the Administrative Panel
Under the Advanced tab, select Limits.
Select the Delete Community button located in the Limits tab and follow the steps it provides.
Select the "Transfer Community" button located in the Limits tab and follow the steps provided.
Once you submit for the transfer in Sonoran CMS you'll receive an email regarding the transfer, this is to confirm and finalize it. Once you get the email click the button located on the bottom which will take you to Sonoran CMS to finalize it. You'll be notified upon full load if the transfer went through. The new owner will receive an email stating their new ownership.
You can also submit forms in reference to or on the behalf of other users with the Submit 3rd Party Application/Form permission.
To do this in the form submission, simply select their user in the dropdown menu labeled You are submitting this form under.
Toggling the bell icon will notify this user that a form has been submitted under them.
As a user, your submissions can be viewed below the Available Forms section, or on your profile.
Admins can view form submissions under Available Forms > Go To Submissions or in the admin panel under Forms > Go To Submissions
In the form submission board, drag-and-drop to change a form stage. Or, click to open the submission and change it from the drop-down.
Click the share icon to copy a direct URL to the submission viewer.

Players with configured priority CMS ranks will appear at the top of the list. Their CMS rank icon will be displayed at the top left of the avatar and can be hovered over for more information.
Players who recently had a command ran on them will be displayed at the top of the player list with a badge reflecting the command.
On each player card, a clock icon will show the current connection time. Player time can also be automatically shown on a community roster.
Clicking on a player opens a modal with more information and player actions. Here, you can kick, ban, or add disciplinary points. Additionally, you can view their linked Discord account and Roblox profile.
The Activity expansion area will show all recent player logs and records. Click the orange icon to change between viewing all activity and viewing player records only.
The Vehicle expansion area will show the player's current vehicle in-game.
The player record panel allows for the creation of player records.
The Latest Activity section displays real-time logs for player connections, disconnections, commands, and player records. Click the orange icon to toggle between viewing all logs and viewing only player records.
Use the search bar to find logs by username, or apply filters to locate specific player records.
At the top left, you can select what game server to view. Use the join button on the right to automatically launch Roblox and join the ER:LC server. You can also add a new ER:LC server or delete an existing one from the dropdown.
You can select the ranks you would like and input the principal identifier you would like to grant them. This makes it easy to grant users in-game permissions en masse.
You can further customize the permissions each Principal group receives in your server.cfg, make sure to follow the conventions outlined in this guide.
Additionally, ensure all players have added their API ID to the CMS.
For more details, read our documentation on the "Ace Permission Sync" module for CMS Core here.
add_ace resource.sonorancms command allowThe logging center is located in the Administration Panel > Security Center
Users will need the Security Center permission under the System tab in the rank manager.
Logs can be searched and filtered by the type, user, and date of occurrence.
All logs are stored for 30 days, regardless of your subscription tier. Some logs (kicks, bans, permission changes) are stored indefinitely.
AI powered log searches are only enabled with a Pro Subscription!
Learn more about our paid plans.
With the large amount of logs to search through, our AI agent can help automatically find relevant logs and provide a summary of the actions. Simply type your question including any details about the username, unique ID, Discord ID, Roblox ID, TeamSpeak ID, or action types to get started.

Learn more about Sonoran Bot's CMS integration features:
Configure Sonoran Bot's settings in your server:
Reference a list of bot commands:
Last Name
Gender
DOB
Nationality
Phone Number
Cash Balance
Bank Balance
Crypto Balance
and more!
Select the Inventory tab on a character to open a drag-and-drop inventory manager.
Currently, Sonoran CMS supports the following QB Core inventory scripts:
QB (Base) Inventory
Ox Inventory
Quasar Inventory
Project Sloth Inventory
Origen Inventory
Core Inventory
Tgiann Inventory
You can suggest more integrations on our support portal.

Your ERLC API Key authorizes Sonoran CMS to access your game server information.
ER:LC grants API access as a paid upgrade.
Once in-game, select the Menu button at the top left > Servers > Owned Servers > Select your private server > Upgrade Packs > API Pack.
Once in your private ER:LC server, open the Server Info tab.
Select Edit Server Settings > Navigate To ER:LC API > Select Edit to Copy.
In the CMS, paste the ER:LC API key into the setup modal.
For full functionality, users must link their Roblox and Discord accounts to their CMS account.
The Discord account link banner automatically appears once one or more Discord servers are added in the Integrations panel. The Roblox account link banner appears when the ER:LC panel is enabled. These banners will show at the top of the CMS for all users who do not have their social accounts linked.
Additionally, you can enforce Roblox and Discord account linking requirements in the ER:LC Whitelist panel.
For every Sonoran CMS addon installed, there will be a config.lua or config.json file present.
You can open these configuration files with a text editor and change values.
For more information on a plugin's configuration options, you can view the individual plugin guides on the submodules page and scroll down to the configuration section.
If you modify a configuration file, be sure to save it and restart the server.


Blackout simulates a power outage, and all buildings will show as if they don't have electricity.
You can also set the time to any time of day using the time selector. You can also toggle Freeze which locks the time to whatever you've set it to.
Sometimes, having CMS installed can cause an issue where the weather and time in the server seem to rapidly "flicker". This occurs when another resource is also trying to manage weather.
If you are encountering this issue and would like to disable CMS's weather management, then please set Config.EnableWeatherSync to false in the resource's config.lua.
Toggle the Roblox and/or Discord requirement(s). Then, define custom actions to trigger when a user joins your ER:LC panel without having a linked Roblox or Discord account in the CMS.
Available actions include public or private in-game messages, Discord webhooks, push notifications, and more.
The allow and deny lists let you control game access based on CMS ranks. These lists are activated once one or more ranks are configured.
When enabled, only users with a Roblox account linked to a CMS account that holds an allowed rank can join the server. Users without an allowed rank will be kicked automatically.
If a user’s CMS rank appears on the deny list, that restriction overrides the allow list — those users will be kicked upon joining.
The Team, Vehicle, and Livery Restrictions panel allows you to control which ER:LC teams, vehicles, and vehicle liveries players can access based on their CMS ranks. Select the badge icon next to a team, vehicle, or livery to configure which CMS ranks are permitted access.
Then, you can define automated actions for users who access a team, vehicle, or livery without the required ranks. Available actions include removing them from the team, sending messages, triggering Discord webhooks, and more.
Blackout simulates a power outage, and all buildings will show as if they don't have electricity.You can also set the time to any time of day using the time selector. You can also toggle Freeze which locks the time to whatever you've set it to.
Sometimes, having CMS installed can cause an issue where the weather and time in the server seem to rapidly "flicker". This occurs when another resource is also trying to manage weather.
If you are encountering this issue and would like to disable CMS's weather management, then please set Config.EnableWeatherSync to false in the resource's config.lua.


This guide covers managing Calendar Events in Sonoran CMS.
Community Events allow you to organize and plan events for your community to further engage with your members. Events allow you to plan the start & end time, title, description and an optional header image for each. Events also allow your members to RSVP to track who's attending your event.
To access the Community Calendar navigate to the top toolbar and select "Calendar".
To create an event click the "Create Event" button along the top of the month selection. This will open the Event Creation dialog, and from there select the Calendar Category that you're wanting to create an event for.
Once you've got the create an event dialog you can now input all of the event information that you'd like to associate with this event, once the event is created it can be edited if any information is no longer correct.
Setting the RSVP Limit from anything but -1 will restrict the total RSVP spots available, setting it to -1 will allow for an unlimited spots for RSVP.
Once you're satisfied with the information inputted for the event you can publish event, this will now add the event to the calendar to be accessed by your community.
To RSVP for an event navigate to the Community Calendar, select the event you're wanting to RSVP to and click the "RSVP" green button on the bottom left of the event view. This will now mark yourself as attending the event, at any time you can remove yourself from the RSVP for the event by navigating to the event and clicking the same button.
To share an event to your community members you can simply click the "Share Event" button located on the event, this will copy the share URL to your clipboard. You can now share this URL with members of your community to view.
To edit an event simply navigate to the event and click the orange pencil paper button located on the bottom row. This will open up a dialog to edit details of the event.
Once you're satisfied with all of the event details you can click the orange "Save" button and it will be saved.
To remove an event simply navigate to the event and click the red trash can button located on the bottom row. Once you click it, it will be removed from the community calendar.
If you have linked you community to our , creating an event in CMS will automatically create an event within your community's Discord channel making it easy to coordinate community events across multiple platforms!
By clicking the Interested button, you will be automatically RSVP'd in CMS.
Easily manage in-game vehicles with the CMS QB Core management panel!
You can switch to view only live vehicles active in the server, or all vehicles in the database at the top right.
Selecting Add Vehicle at the top right allows you to create a new vehicle and assign it's ownership to a player.
Select any vehicle to modify it's information, transfer ownership, repair it, or delete it from the server.
Currently, Sonoran CMS supports the following QB Core garage scripts:
QB (Base) Garages
Codesign Garage
Quasar Advanced Garages
JG Advanced Garages
You can suggest more integrations on our or if you would like to add the support yourself, simply paste this code snippet in any SERVER-sided file in your garage resource.
Easily manage Sonoran Radio permissions from Sonoran CMS ranks! Learn more below.
Sonoran CMS allows you to easily manage your community's Sonoran Radio permissions based on their Sonoran CMS rank automatically!
This sync requires Sonoran Radio Standalone.
If you are using the Sonoran Radio TeamSpeak, view our TeamSpeak integration.
Click the Sonoran Radio icon or click the plus button to sync another Radio to you community
Enter your Sonoran Radio community's ID & API Key.
Your Community ID and API Key are located in Sonoran Radio's Administration panel.
Enter these into your Sonoran CMS as shown below.
Check the sync options that best fit your community's needs, explanation of each sync feature can be found .
Select a CMS rank and toggle the desired Radio permissions below.
When you're done setting up Radio sync and configuring permission mappings, simply close out of the window by clicking the red X button and it will automatically save your credentials, settings, and trigger a mass sync of all permissions.
Permission syncs from Sonoran CMS will set the user's permissions explicitly to what is mapped in the CMS and will wipe any non-enabled permissions.
Sync multiple Sonoran Radio communities with your single Sonoran CMS community. This will sync all of the below features with each community you have setup.
This will trigger an action to kick the same user from your Sonoran Radio community if they're kicked from your Sonoran CMS community. This also applies to bans.
This will have all new members that join your community automatically join your Sonoran Radio community under the same user account.
This will automatically set a user's radio display name to match their CMS display name. This is updated on:
CMS community name change
User account update/save
Radio integration configuration change
Log player records for warnings, punishments, notes, and more!
New player records can be created directly from the ER:LC server dashboard.
Kick and Ban records automatically execute the corresponding in-game commands.
Disciplinary Point records add a specified number of points to a user and can be used for warnings or punishments.
Note records allow staff to store important information or observations about a player.
Player records can be added via by using the /erlc record command.
ServerID specifies the ER:LC server you wish to add this player record to.
Player is a selected Discord user or Roblox user ID.
Players must for this to work!
Type is the type of player record (kick, ban, disciplinary, note, etc.)
Players in-game can use the :log command to create records.
Syntax: :log record [type] [player name] [points - optional] [reason]
Example: :log record note John This is an example note!
Record Types:
points (uses extra [points] parameter)
note
kick
Players can also manage their timeclock in-game using the :log command.
Timeclock shift types are configured in the community customization panel.
:log clockin [shift type - optional]
Find a specific record by expanding the filter menu on the Latest Activity section to specify a record's type, staff member, user, and date range.
Click the orange icon to toggle the latest activity from viewing all activity logs and records to viewing only recently added records.
Click any player to open their account modal. You can view all recent activity and records in the Activity expansion area. Additionally, click the orange icon to toggle from viewing all activity logs and records to viewing only recently added records.
Click any player record to open it in the editor. Here, you can modify the record and view the record's edit history.
You can enable role syncing with TeamSpeak after setting up the connection by navigating to the Role Sync tab and checking the Enable Role Sync button.
Steps for adding a rank that is associated with a group on your TeamSpeak server:
Click the Add Mapping button on the CMS admin panel
Select the CMS department and rank you'd like to use in the dropdown that just appeared
Input the TeamSpeak group permanent ID into the TeamSpeak Group ID input
A TeamSpeak's group ID can be found by hovering over it in the permission editor
Additionally, if you have Sonoran Radio installed you can also follow
Repeat this for all ranks you'd like to map to a TeamSpeak Group.
This method will soon be deprecated and be replaced by the following:
(Coming soon) Select a TeamSpeak group from the dropdown to the right.
For users in your community to benefit from this feature, they must setup their TeamSpeak UID after you've setup your connection. Check out this guide for adding your UID to CMS:
Receive instant notifications in your Discord channel when new forms are submitted, community customization changes, and much more!
In the Sonoran CMS Administrator Panel, under Advanced select Integrations > Discord
In order to configure your Sonoran CMS Webhooks you must invite and configure Sonoran Bot. Follow each step in the setup process stepper directly in the Sonoran CMS UI.
Select the channel you want your webhook logs to send to for each log type When you are done editing, click anywhere outside and it will automatically save any changes.
In the middle drop down menu you can select any roles you would like to be mentioned in the webhook. You can select as many roles as you wish and this will mention these roles at the beginning of the message.
Alternatively, if you would like to integrate the mention into the content message, you can also manually mention roles.
To tag and mention a role in the webhook edit the Webhook Content box and format the mention as <@&ID> with ID being the Discord Role ID.
You can copy a Discord Role ID in your Discord server's Settings > Roles > Right-Click on the role > Copy ID
You can also right-click on any user's role in their profile popup and copy the Role ID from there.
Example: <@&1234567890>
To tag and mention a user in the webhook edit the Webhook Content box and format the mention as <@ID> with ID being the Discord User ID.
You can copy a Discord User ID in your Discord. Right-Click on the user > Copy ID
Example: <@1234567890>
Easily manage in-game players with the CMS QB Core management panel!
Click on any online player to interact.
Copy unique identifiers
Warn the player in-game
Kick the player from the server
View their
Selecting Warn on a player will prompt you to add a reason message. The player will then receive a warning notice in-game, requiring them to hold down SPACE for ten seconds to dismiss.
The ER:LC panel also has extended functionality from other areas of the CMS
The ER:LC panel extends functionality to CMS rosters by allowing you to add an Activity Tracker Hours column that automatically displays each user’s in-game time over a configurable period. This column can also be configured to track time spent on specific ER:LC team(s).
The performs routine actions at custom intervals. This panel integrates with the ER:LC panel to offer automated in-game hints and notifications.
can be assigned either through an or manually in the CMS. Once a user exceeds a defined point threshold, the associated disciplinary actions are executed automatically.
The ER:LC panel extends this functionality by enabling automated kicks or bans when a user reaches the configured disciplinary point limit.
To begin, head to Administrative Panel > Integrations > TeamSpeak
Once in that section, enter the information corresponding to your TeamSpeak server:
IP/Hostname: The IP (like 1.2.3.4) or the hostname (like google.com) that you use to connect to your TeamSpeak server
Query Port: By default 10011 for most TeamSpeak servers (especially self-hosted ones). Check with your host provider to be sure
Server Port: The port you use to connect to your TeamSpeak, which is by default 9987. (This will always be different from the Query Port)
ServerQuery Username/Password: Check the section below for creating a serverquery login
Once you put all the TeamSpeak information into the inputs, click the Save Integration Settings button to save. If something is wrong, it'll display an error at the top of your screen that identifies the issue. If all correct, you should see:
This method is the easiest for creating a server query login, but the permissions of the login are tied to the user creating it. In the event that the person who created the login loses their permissions, role syncing will not be possible
While connected to your TeamSpeak server, go to the Top Toolbar -> Tools -> ServerQuery Login
Enter any preferred username into the "Name" field of the popup and click OK
In the new popup, the "Name" field is your username is the "Password" is your server query password. Note that you will lose the password if you close the popup without saving it.
This method only works if you self-host the TeamSpeak server, but it doesn't have the permission issues like the user method.
The serveradmin password is found:
In the original popup when you create your TeamSpeak, the same dialog that had your Server Admin permission key
Or by changing the serveradmin password manually ()
Now that you have the password, you can put that into CMS along with the username serveradmin
Now that you've got the connection, it's time to setup which CMS Ranks correspond to which TeamSpeak Groups!
A whitelist system that utilizes Sonoran CMS's game whitelist system.
Looking for VPS, web, or dedicated hosting? Check out our official server hosting!
This whitelist module utilizes Sonoran CMS's to enforce player connections.
If using QBCore or VMenu on your server, it is recommended that you control whitelisting through their respective game panels, rather than through this plugin. For more information, see the links below:
Locate the whitelist module within your [sonorancms]/sonorancms/server/modules folder and rename whitelist_config.dist.json so that it is just whitelist_config.json.
Next, open the whitelist_config.json file and set enabled to true.
Navigate to the Rank Manager within the Administrative Panel.
Administrative Panel > Ranks
For users in your Sonoran CMS community to be accepted through the whitelist, they'll need to be granted permission for the whitelist through rank permissions.
Granting each rank the permission of Allow Whitelist allows those members through the whitelist.
Granting each rank with the permission of Block Whitelist blocks users from passing through the whitelist.
Block Whitelist will ALWAYS overrule Allow Whitelist If a user is granted both Block Whitelist and Allow Whitelist through various ranks they will be blocked from the whitelist. Block will always overrule allow.
Ensure all players have added their to the CMS!
In the event that the CMS API is temporarily unavailable, this resource utilizes a local backup cache. The resource will automatically fall back to the latest saved version of the whitelist, allowing members to join as normal.
Configure routine actions to be performed in the CMS.
Actions are routine automations ran at specific intervals. Communities may wish to send an in-game reminder message every 10 minutes, or a Discord webhook once per hour.
In the actions panel actions can be configured, enabled, and manually triggered.
Interval: Triggers the action every X minutes.
Roster: .
Allow further customization on your community member's profiles. Easily add and edit date directly on a profile with view & edit permissions.
Profile Fields allow communities to put direct information onto member's profiles that can be restricted to certain viewers, editors, etc. with rank permissions. Profile Fields are dynamically displayed on profiles depending on what ranks the profile you're viewing holds.
Easily create and edit profile fields to your liking to fit your community's needs. Each field can be customized to have a different type and label with more to come in the future. Additionally, you can drag and drop profile field blocks to change the order in which they display on user's profiles.
Now that you've created your community and started to invite users you'll want to start creating groups. Learn more below
To access the "Rank Manager", head to Administrative Panel > Ranks
Within the Rank panel you'll be able to create groups and ranks for your members, this will be the central panel for deciding permissions based on "ranks", when new, removed, or modified Custom Forms, Calendar Categories, and Rosters will be reflected with available permissions under each rank.
Our desktop app allows you to advertise your community right in Discord!
ATTENTION: This feature is currently no longer within Sonoran CMS and will be reintroduced in a future update.
Grow your community with new traffic from Sonoran CMS!


Additional inputs may be needed for reasoning, points, etc.
ban


AK47 QG Garage


local function getAllGarages()
local garages = {}
for k, v in pairs(Config.Garages) do
garages[#garages+1] = {
name = k,
label = v.label,
type = v.type,
takeVehicle = v.takeVehicle,
putVehicle = v.putVehicle,
spawnPoint = v.spawnPoint,
showBlip = v.showBlip,
blipName = v.blipName,
blipNumber = v.blipNumber,
blipColor = v.blipColor,
vehicle = v.vehicle
}
end
return garages
end
exports('getAllGarages', getAllGarages)To start creating profile fields go to the Administrative Panel > Profile Fields.
Once you've located the editor you can start by clicking the green Plus button, this will enable the creation process. From here you'll customize the label, type, and options (if you have chosen the field type of select).
If you choose the field type of select you'll be required to enter at least one option, once you type in an option press Enter on your keyboard and a new option will be added.
Once you're satisfied with the customizations you made to the field you can click the orange Save button.
Now that you've created a field you'll want to move onto the next section detailing the permissions associated with fields.
Profile Field Permissions are essential to managing your fields for your members, permissions create "settings" for each field that accounts abide by when viewing profiles. Understanding these permissions will allow you to better leverage the use of Profile Fields.
Below we've outlined each permission and how they work with fields:
Restrict Visibility
Only users with specified ranks are allowed to view this field.
Allow Editing
Users are allowed to edit this field on their profile.
Allow Others to Edit
Users with specified ranks are allowed to modify this field on another's profile.
In the Profile Fields editor, you can select the specific ranks that you want to apply this permission to. Click on the profile field you would like to edit, then click on Edit Permissions at the bottom of the box.
This will open a box where you can select which permission you would like to modify, and within it you can select which ranks you would like to grant this permission to. In the following example, the ranks "Manager", "Super Admin", and "Admin" are given permission to edit this field on their profiles.
You can also control these permissions from the Rank editor. To do this, navigate to Administrative Panel > Ranks.
Select the rank that you'd like to edit and review the permissions below while selecting which permissions you'd like to grant to the rank.
These permissions integrate with the permission settings in the Profile Fields editor, toggling a permission in the rank editor will automatically check the rank's box inside the Profile Fields permission editor.
While viewing a profile you can hover over them to determine if you have edit permissions or not. Hovering over a field that you can edit will display the tooltip as shown above.
Once you've clicked a field it will give you a pop-up to begin editing the field's value. Depending on what field type it is it will display the relevant field input type. Once you're satisfied with the fields new value you can press the Enter button to save it on the profile.
The text array profile field allows for multiple strings of text to be added to an individual profile field, this is useful to store notes, Steam IDs, IPs, etc.
To edit, click the "Expand" expansion located under the Profile Field Label. This will display all entries of the array. Click in the middle of the entries or if you have none, you can press the "Click Me" button. Once you're satisfied with the field's new value(s) you can press the Enter button to save it on the profile.


Click the "Add a New Group" button, which can be found at the end of your existing groups (or the beginning if you're on mobile). Once clicked, a dialog popup should appear
The dialog contains one crucial field for your group:
Group Name (Example: Police Department)
You do not need to customize anything to create your group, so saving now is fine. When you're ready to save, click anywhere outside the group box. Or, you can set permissions associated with the group.
This is where you'll need to assign permissions that you want all ranks within the group to inherit. These are the same set of permissions that ranks are able to get assigned but will be applied to all ranks upon permission evaluation.
You can toggle all permissions in a category with the Toggle button above the permissions.
In the group header, click the green plus button to begin creating a new rank
This will bring up a new dialog where you'll need to input a name and setup permissions for your new rank.
Permissions on a rank dictate what a person with that rank can do. There are many different types of permission scopes:
Rank permissions can be assigned using the same method as group permissions. There are many different categories of permissions you can assign, for example:
"System" permissions are for general administration (e.g. kick, ban, clock in & out).
"Navigation" permissions are for viewing navigation buttons.
"Forms" permissions are for the custom forms.
"Rosters" permissions are based on the custom records made in Administrative Panel > Rosters.
"Calendars" permissions are based on the calendar categories.
"Profile Fields" permissions are based on the Profile Fields created in the Administrative Panel > Profile Fields.
"Servers" permissions are based on the API Integration servers made in Administrative Panel > Integrations.
When you are done customizing your rank permissions, click anywhere outside to close the dialog and automatically save it. Your new rank will show up under the group you created it in.
You search for specific permissions. This will bring display a number of how many settings match your search in each category, and will show only the ranks in a given category that match the search.
If you ever want to modify permissions, click the person icon to the right of the name to open the dialog again.
Ranks are able to be customized to the styling that best fits your community. You are able to customize the color and icon associated with each rank. You can specify common color names or custom hex colors. To access this setting, click on the icon to the left of the rank name.
To the top right of the rank name you will see a number, by default it is 0. Click on this to access the rank power tab. Rank Power determines who has higher authority in the community.
Instead of manually creating rank for everything, you can also directly import the roles from any linked Discord server directly to your CMS Community.
To do this, in any group, click the Discord icon in the group header.
Next, click Select Guild and select the linked guild you would like to import roles from. If you have not yet linked a Discord guild to CMS, you must do so through our Sonoran Discord Bot.
When you select a guild to import roles from, it will populate the window with all existing roles within that Discord. You can select which roles you would like to import, or click the top checkbox to select all.
Finally, click Import Roles to Ranks at the bottom of the window, and new ranks matching the name and color of the roles will be created:
Please note that you will still have to configure permissions for these newly created ranks. By default they will assume the permissions of their department, but any further changes must be done manually.
Some integrations may require you to input Sonoran CMS rank IDs.
Select the ... menu and the Copy Rank ID button to copy the rank ID to your clipboard.
Administrative Panel > User AccountsWithin this "Accounts Panel" is where you'll be able to see every user that has joined your community. From here you can click and edit their information and permissions.
To edit a user’s account, left-click their row in the User Accounts table. This opens a dialog where you can update details such as Rank and Identifiers. Assigning ranks grants the user the permissions associated with those roles.
When adding identifiers, type the value and press Enter to apply it.
A user’s permissions are active only when their System Status is set to ACTIVE. If a user is archived, all permissions are revoked and their access to the community CMS is restricted.
In the User Accounts viewer, you can now tick the checkboxes to select multiple accounts at once. This will allow you to perform actions on multiple accounts at once.
Once you have selected the desired accounts, click on the Icon button above to open a dropdown of every action you can perform. For rank management, you have the following options:
Set Ranks will automatically replace all assigned ranks with whatever rank you specify
Add/Remove Ranks Allows you to add or remove any ranks to selected accounts
You can also perform administrative actions (currently Kick, Ban, and Archive) on multiple users at once through this dropdown.
Instead of left-clicking a user's row you can right-click which will prompt you with two actions:
Edit Account Information which will pop up with the above dialog
View Member Profile will redirect you to the user's community profile which will provide more information.
If you have permission to edit the individuals information in the Account Viewer you can edit the member's name in their Community Profile by clicking their name or the blue pencil shown to the right of it. The pencil will only show if you have permission.
You can configure any rank to expire either after a set duration or at a specific date and time. To begin, assign the user the rank you want to schedule for expiration.
After selecting the rank, click the yellow Set to Expire button. A dialog will appear where you can choose between a time-based expiration (e.g., after a certain number of days) or an exact expiration date and time.
Once you’ve configured the settings, click the green Set Expiration button to apply the expiration schedule.
In the User Accounts page, you can filter users by rank so that only users who hold the rank(s) you've selected will be shown.
To filter by rank, open the dropdown menu to the right of where it says User Accounts:. In there you can department sub-menus and click on ranks to filter them. You can select multiple ranks to filter if you would like.
To clear filters, you can click the X in the menu box.
Below that you can alternatively choose to display Pending, Banned, or Archived members.
You can automatically grant a default rank for all users who join your community. This could be used if you want to have a specific rank for inquiring members that only gives them access to certain forms.
In this case you would click the green plus button, add a Modify Ranks block, then select the rank you wish to grant.
Granting a rank will automatically change a new user's status from Pending to Active.
Alternatively, if you do not set a rank on join, new users' statuses will remain as Pending, prompting them to fill out a membership application.
When bad actors are banned from your community, it's important to ensure they don't come back under a different account name, alias, etc.
Sonoran CMS offers advanced tools to detect ban evasion, easily detecting duplicate accounts on member applications, forums posts, user profiles, game session joins, etc.
Account flags are raised when a user has a "clash" with another account in your CMS.
Ex: "Bob123" logs in with the same IP address as "Alice456" -> this results in a Duplicate IP flag
Duplicate IP Address
Duplicate Browser IDs
Duplicate PC Hardware IDs
Duplicate Mobile Device IDs
Duplicate Linked Discord IDs
Duplicate CFX License (in-game)
Duplicate Steam ID (in-game)
Duplicate Xbox Live ID (in-game)
VPN Usage Detection
In the Administrator Panel the Security Center tab highlights all active flags that need to be reviewed.
Anywhere an account avatar is visible it will also show a user's account flags.
Forms and Applications
Forums Posts
User Accounts Panel
User Profile and Bio
Select the highlighted flag on a user's account avatar to automatically redirect to the security center with their specific flags raised.
Select a flag in the account flags center to view more details. This will show what type of flag it is and what accounts it has been raised on.
Investigate the flag type and the users involved. If one of the users was a previously banned user, and the other is a new member - it's possible it's the same person trying to evade a community ban.
This example shows user 8 (SonoranBrian) linked a Discord account that a banned user 14 (Bob123) previously used.
When viewing a flag, the user accounts mentioned may also display one of the following icons:
🚫 - This user is banned in your community
🕒 - This user is pending in your community (no ranks yet, new applicant)
❓ - This user has not yet joined your community but may be an alternate account of someone who is already in your community
Sometimes two different users may be harmlessly sharing the same physical device, IP address, etc.
Ex: Two users sharing the same Wi-Fi network, but both are in your community.
After investigating why these two users have a shared identifier, and that it's harmless, you can "dismiss" the flag. Once dismissed, the flag with the involved accounts will no longer appear unless an additional account matches up in the future.
In order to view and manage these account flags, users will need the Security Center Manage Flags permissions under the System tab in the rank manager.
When running our desktop application, Discord can automatically detect and display information about your community.
Discord presence currently allows for two customizable buttons.
Navigate to Administrator Panel > Customization > Community Customization > Discord Rich Presence Customization
- Button #2 may be customized to any Sonoran CAD or Sonoran CMS invitation link.
- Ex: https://sonorancad.com/#/?comid=mycommunityid or https://sonorancms.com/#/?comid=mycommunityid
- Both buttons may be customized to any URL desired. - The Icon and title can also be customized with a Discord developer application.
Communities on the Pro version may customize the rich presence icon:
On https://discord.com/developers/applications create a new application
Under OAuth2, copy your Client ID
Next, upload an icon for your new application. Be sure to copy down the name of the icon for later.
Back in the admin customization menu, we can paste the Discord application's Client ID and Icon name.
Once saved, your Discord presence for all community members will reflect your custom icon, title, and buttons.
To hide the invite button for your community's Discord Rich Presence, simply leave the button text and URL blank.
In the profile dropdown, users can toggle this display on or off for their individual desktop client.
Download the CMS Core. This download will already have the config filled with your Community ID (or UUID) and API Key.
Once installed, the config.lua will configure your Community ID (or UUID) and your API key. It is recommended to keep all remaining config options with their default values.
In your server.cfg file, add the following lines to run the CMS core resource and grant permissions to the auto-updater.
Due to recent changes to FiveM there is now security limitations to the file system which the game panel uses to update Items, Jobs, Gangs, etc. This requires the add_filesystem_permission line(s) to be added to the server.cfg shown above, as well as the author of the resources to be updated. You can find out more information on why this is required here.
QB-Core Specific
Update qb-core/fxmanifest.lua author line to the following:
author ''
QBox Specific
Update ox_inventory/fxmanifest.lua author line to the following:
author ''
Note: We're working on making this not a requirement in the future but need to work with the respective resource developers to get it updated.
Select Edit Servers to include the IP address and port used to direct connect to your server.
By default, only community owners will have access to the QB Core management panel.
In the Rank Manager, you will need to add the associated permissions under the Server tab.
View the next guide below to start using the QB Core game panel.
This category is based on user growth as a percentage and is limited to communities between 50 and 250 members.
Improve your ranking in this category by signing up new members in your community.
This category is based off the number of unique user visits to the homepage per day.
You can improve your ranking in this category by using CMS as your primary website. Both visitors and members count towards traffic.
This category is based off of the number of unique user logins in your community per day.
You can improve your ranking in this category by having your members utilize your CMS website more frequently. Using a custom domain, running all applications/forms via CMS, utilizing online CMS forums, etc.
This category randomly selects communities that have been bumped in the last hour.
You can improve your ranking in this category by bumping your community in the discovery panel.
Bumped communities are also posted to the #advertise-here channel in our Official Discord!
Every time your community is viewed or clicked on via the community discovery page, or CAD/CMS/radio menu those metrics are logged.
You can view these in the growth panel to see how the community spotlight and discovery page are impacting your community.
In order to be on the community discovery page, communities must meet specific criteria:
The community must be more than 72 hours old.
The homepage must be customized and cleared of any default/placeholder text.
The homepage must have a clear button or link for a new user to apply or join.
Once these criteria have been met, select the Bump Discovery button in Discovery Settings.
enabled
If set to true it will enable a whitelist for your server and only individuals granted Allow Whitelist as shown below.


The Sonoran CMS Forum System completely replaces the need for any other forum application for your community!
The Sonoran CMS Forum System is a custom page element allowing you to create and organize your forum(s) to fit the needs of your community. Easily add Forum Categories to any custom page, create or use existing categories across multiple pages. Each category has the ability to manage permissions to Create a Topic, Remove Topics, and Remove Topic Replies.
To create a Forum Category navigate to the website builder located at Administrative Panel > Website Builder. Once you've located the editor, add a Forum Section to your Custom Page.
Now that you added a Forum Section you can select from existing Forum Categories or create a new one. If you're looking to create a category, simply click the forum category . This will display a popup with various inputs, click on editor then create and fill in the category label and select the permission preferences that apply. Once the category fits the needs that you like click outside the box and it will save automatically.
Once you have saved the Custom Page you can now view the page with the Forum element added.
To create Forum Sub-Categories navigate to the Custom Page Editor located at Administrative Panel > Website Builder. Once you've located the editor, select a page that has a Forum Section already.
Now that you're at an already set up Forum Category you can easily add sub-categories by clicking on Add Sub-Category, on the desired forum. Click this button and it will prompt you with the sub-category label. Input that sub-category label that you would like and click SAVE. This will add the sub-category to your forum category, sub-categories can be created on sub-categories to create a forum category depth of your choosing.
To view forum topics navigate to a Custom Page that has a Forum element added. Once you've located a page you will be shown a table with all of the topics in the forum category. Click the topic table row to open up the topic for viewing and replying.
To create a forum topic simply click Post Topic button located on the Forum Topics table, this will display a topic creation dialog. Fill in the appropriate information for the topic you're wanting to create. Once the topic information suffices your needs simply click the green CREATE TOPIC button to create the topic. Once it's created it'll automatically navigate you to the topic. This will allow you to edit and reply to the topic.
Forum topics can include image attachments during creation. To add them, go to any Forum Category and click the green Create Topic button. In the popup, use the uploader near the middle/bottom to select your images. After creating the topic, the attachments will appear below the topic content.
Private topics let users create forum posts visible only to the ranks they choose, allowing tighter control over sensitive discussions inside public categories. To create private topics in a category, a user must have permission on the root category. To allow a rank to create private topics, add that rank to Can Create Private Topics in the forum section’s permissions.
To create a private topic you will need to locate a Forum Category and click the green button in the top right, this should provide you with a popup dialog to create a topic. On the bottom there should be settings for private topics as well as a switch to toggle this topic as private. Flip the switch to toggle the topic as private on and add the ranks that you would like to view and reply to the topic.
To improve the organization of your forum, you can pin and lock topics. Pinning a topic will move it to the top of the forum category, and locking a topic will prevent any new replies from being added. You can access these options by right-clicking on a topic from the list view, or by using the buttons next to the edit and remove options while viewing a specific topic. These features will help keep your forum organized and on-topic.
Each Forum Category can have it's own sub-categories created for it, this allows for better organization and design of your forum categories.
To get a complete view of all the topics in a specific forum category, you can navigate to its dedicated page. This page can be shared with other members through a link, so they can easily access it as well. You can access the dedicated page without having to use a custom page element, so it's quick and easy to view all the topics in a particular category.
To view the dedicated page for a particular forum category, first locate the custom page forum element that contains that category. Then, click on the category's name at the top-left corner of the topics table. This will take you to the dedicated page for that category, where you can see all of the topics it contains.
Easily manage Sonoran CAD permissions from Sonoran CMS ranks! Learn more below.
Remove all the hassle of managing your community's Sonoran CAD permissions. Sonoran CMS is now your single point of management!
Sonoran CMS allows you to easily manage your community's Sonoran CAD permissions based on their Sonoran CMS rank automatically!
Click the Sonoran CAD icon or click the plus butt on to syn another CAD to you community
Click the Enable Sync check box and enter your Sonoran CAD community's ID & API Key.
Your Community ID and API Key are located in Sonoran CAD at Admin Panel > Advanced > In-Game Integration > Web API.
Enter these into your Sonoran CMS as shown below.
Check the sync options that best fit your community's needs, explanation of each sync feature can be found .
To edit, click any rank on the left-hand side. This tree will contain all department and ranks that your community currently has. Enable all permissions you want to grant to the individual with this rank. When you're done setting up CAD Sync and configuring permission mappings, simply close out of the window by clicking the red X button and it will automatically save your credentials, settings, and trigger a mass sync of all permissions.
Permission syncs from Sonoran CMS will set the user's permissions explicitly to what is mapped in the CMS and will wipe any non-enabled permissions.
Sync multiple Sonoran CAD communities with your single Sonoran CMS community. This will sync all of the below features with each community you have setup.
This will trigger an action to kick the same user from your Sonoran CAD community if they're kicked from your Sonoran CMS community. This also applies to bans.
This will sync all member's API IDs to the same user from your Sonoran CAD community, if they have a Discord account linked to their account it will sync that ID as well.
This will have all new members that join your community automatically join your Sonoran CAD community under the same user ID.
Community Owner's can trigger a full community sync of CAD permissions through the FULL SYNC button located at the bottom of the CAD Rank Permission Selector.
Individual member's can trigger a sync of their account with the community linked CAD in their Account Settings dialog.
Looking to use your own domain name with Sonoran CMS? We've made it easy for you!
Only the Community Owner will have access to change and view Custom Domain settings.
Looking for VPS, web, or dedicated hosting? Check out our official !
Each community gets a FREE vanity URL, vanity URLs allow all communities to get access to the community homepage without a login.
You can also .
Your community's vanity URL can be found in your Administrative Panel > Custom Domain.
The vanity URL will take users to the home page created in the website builder.
Custom Domain requires a Pro subscription.
This can be a root domain example.com or a subdomain cms.example.com
If you are unsure how to add a DNS record, you will need to contact your domain registrar.
Copy and paste the values to add three DNS records (two CNAME records and one TXT record). This verifies your domain ownership, community ownership, and redirects traffic on your domain to the CMS.
The example record below sets cms.example.com as the custom login page URL.
When updating or changing an existing DNS record, it may take some time for the change to propagate (based on your TTL).
You can try running ipconfig /flushdns in a Windows CMD window and restart your browser. Otherwise, you can test with other browsers/devices/users while you wait.
Press Set Custom Domain in the CMS to save. Your new custom domain name will be shown below your vanity URL.
Custom domains prevent other Sonoran CMS communities from being visible. You will need to use the root sonorancms.com domain to view multiple communities at once.
Manage in-game player permissions right from the CMS!
Looking for VPS, web, or dedicated hosting? Check out our official server hosting!
This module manages player's in-game permissions right from the CMS!
Ensure you have the following in your server.cfg (if you don't permissions won't be able to be granted)
Navigate to either game panel's within your Sonoran CMS community and open up the Aces & Principals tab.
This is where you can configure ranks to principal groups, simply select the ranks you want to map to individual groups.
Locate and open up your server.cfg
Configure your aces and principals to how you desire while following the syntax for
Ensure all players have added their to the CMS!
When a player joins the server, the resource will ask the CMS for the players ranks. ACE permissions will be assigned based on the configuration.
For communities on the Plus plan or higher, permissions can be synced instantly in-game when ranks are updated.
Simply add your FiveM server's public IP address and at Administrative Panel > Integrations > Sonoran CMS API > Servers.
Individual players can run the /refreshpermissions command in-game to force a permissions update.
This example is just an example of how you may setup ace permissions and it is unlikely to work just copy and pasted.
In the event that the CMS API is temporarily unavailable, this resource utilizes a local backup cache. The resource will automatically fall back to the latest saved version of the permissions list, allowing members to access permissions as normal.
Generate custom short URLs with your CMS vanity or custom domain!
The URL Shortener is only enabled with a Pro Subscription!
Learn more about our paid plans.
Create friendly, short URLs for anything in your community!
The URL shortener takes any link and converts it to a short and readable format!
Ex: https://discord.com/invite/123456 -> mycommunity.com/discord
To forward https://discord.com/invite/123456 to our 's mycommunity.com/discord
Enter the existing URL https://discord.com/invite/123456
Enter the new short URL path discord
(Optional) add a description Discord invite link
After adding the new short URL, it will be viewable, searchable, and copyable in the table below.
The CMS supports three types of short URL formats:
: customdomain.com/shorturl
: example.customdomain.com/shorturl
: communityid.sonorancms.com/shorturl
The custom path will work on all three of these options. The toggle simply allows you to select which format you are copying.
Subdomains are extensions of your custom domain and are used to organize or separate different sections of a website (e.g., info.customdomain.com).
Sonoran CMS has several internal URL paths that can not be overridden by a custom short URL.
Sonoran CMS will also not allow you to override an existing with a custom short URL.
These paths are restricted only in their absolute form. Appending additional paths to these are allowed. For example:
A short URL can NOT be: example.com/forms
However, a short URL CAN be: example.com/forms/civ
Is it time for you to start creating rosters for your community? Follow this page for more information!
To access the "Roster Editor", navigate to Administrative Panel > Rosters
Within this "Roster Editor" panel you'll be able to create custom and automatic rosters with whatever columns you please. You can specify some of the columns to utilize the custom column types that are in place such as the:
The CMS Core maintains common utility functions and push event handling.
# file system permissions (if using QB-Core)
add_filesystem_permission sonorancms write qb-core
# file system permissions (if using QBox)
add_filesystem_permission sonorancms write qbx_core
add_filesystem_permission sonorancms write ox_inventory
exec @sonorancms/sonorancms.cfg


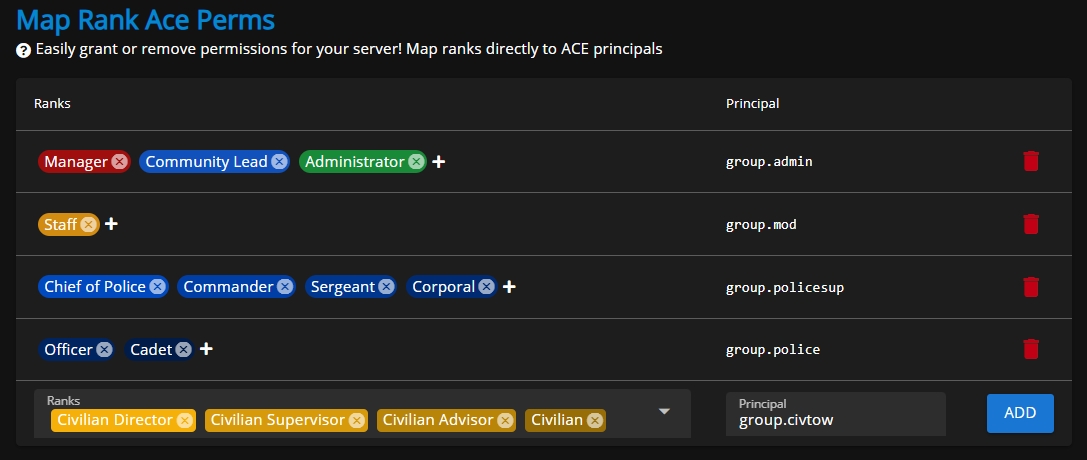
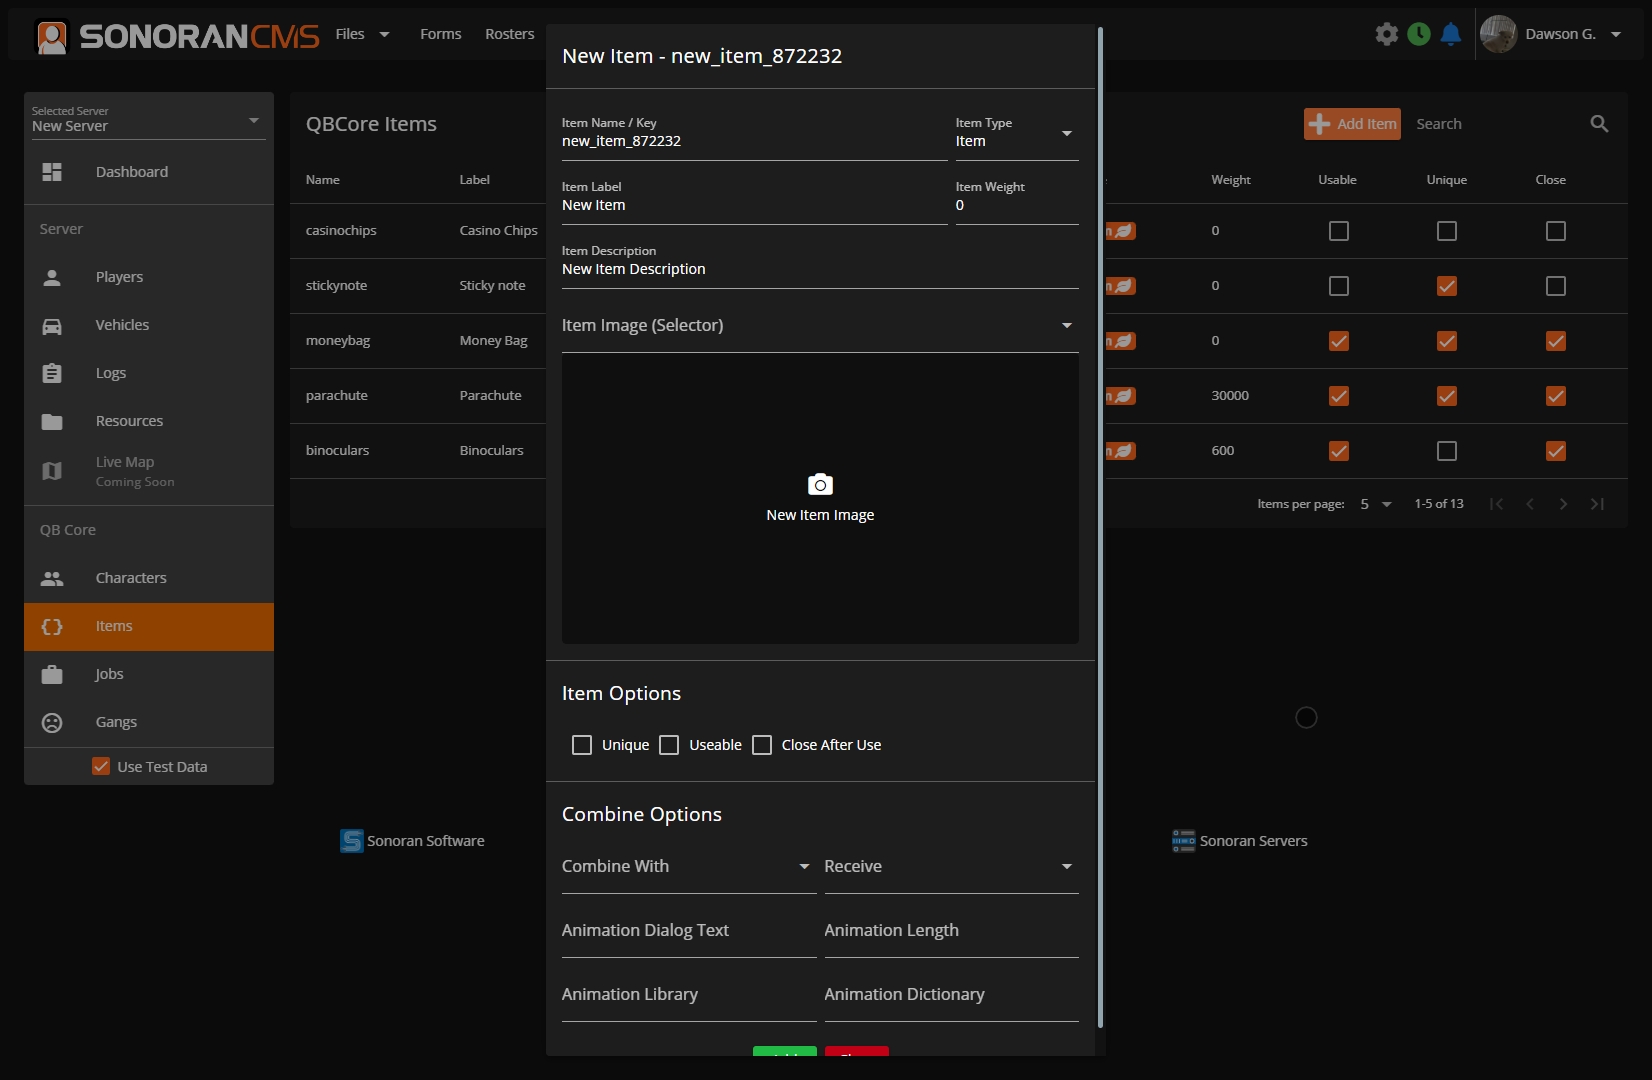
sonorancms.com/com/communityuuid/shorturl


admin
index
login
logout
signup
gallery
menu
event
account
oauth/discord
oauth/sonoran
oauth/apple
drive/file
game/menu
game/qbcore
profile
roster
forums
forums/topics
calendar
formsPatrol Log Hours column type requires a custom form to be created that is a Form Type of Patrol Log.
This column type will automatically calculate hours based on form submissions from a specific time till the current time.
Status Selector column type allows the roster to display custom statuses set in the "Roster Statuses" section of the Roster Editor.
Activity Tracker Hours column type displays how many hours a user has played on the selected server in a specified time period.
This requires that you've added a server in Settings > SonoranCMS API > Servers and have also set up an on that server.
Last Active column type displays the date and time which a user was last active on the selected server.
Just like with Activity Tracker Hours, this also requires that you've added a server in Settings > SonoranCMS API > Servers and have also set up an on that server.
If using a field of type Patrol Log, Activity Tracker Hours, or Last Active, ensure that you select a form or server from the "Source Form" / "Source Server" dropdown.
For the former two, also ensure you specify the date range or time period that the data should be sourced from.
Along the top bar of the editor itself, you can also select an icon which will show at the top of the roster.
You also have customization options for the display of any column you have added to the roster. To edit these, click on any column to open the editor popup.
If you have a column of type Time Log Hours, you can select what form the time logs are being pulled from. Similarly, you can also set the date type to choose whether it pulls time log hours from the last X days, after X date, or within the selected date range.
For each column in the roster editor, you can customize the styling including text color, background color, font, and alignment, as well as the name of the column itself. You can style the content cells differently from the header cell if you wish.
In the Style tab, you can use the rule builder to set conditionals that change the style of cells that meet the given criteria. For example, if you have a column for Community Name, you can create a style rule where if a user's Community Name is equal to a certain value, in this example, SonoranAdam, then the styling will be what has been set below Then:.
As you can see, the user SonoranAdam now has a red background with green text in Impact font, as specified in the Rule Builder above:
You can also use rules for if a value is greater than, less than, or not equal to a set value.
You can also customize the roster's permissions, which determine who is allowed to view and edit it. These permissions apply to the roster as a whole. If you would like to restrict viewing a certain column to only specified ranks, please see Column Permissions
These permissions are housed within Department & Rank Permissions and can be customized for any rank on any individual roster as shown below:
In the roster column editor, you can select any rank that you wish to be able to view a column. If you do not select any ranks, then the column will be viewable by all.
This is the original roster type, this allows you to add and remove roster rows as you please that are associated to members. This allows you to determine the exact order in which rows are sorted.
This is an automatic roster type, this will automatically grab all community members that hold a rank within the specified department and will automatically generate a roster row for each one in the order which the ranks are listed within the department. This still allows you to edit data that's tied to a specific row. For example, if Johnny B. has a row and you want to add a note to the Note column then you can add it and it will be automatically fetched and added to the generated row.
Creating a Department type roster is as easy as creating a custom roster without the headache of adding each individual row for each member. In the Roster Editor, along the top bar click the Roster Departments dropdown menu and select what department you would like this roster to be associated with.
Once you've figured out the department for this roster you can now design the roster columns as you please. Don't forget to click the orange Save button once you've finished. Once it's saved you can go to the automatic roster and see all the generated rows.

Locate the clockin module within your [sonorancms]/sonorancms/server/modules and open the clockin_config.json file
enableCommand
Registers the specified command that allows you to toggle clock in/out.
command
If enableCommand is true, this will be the registered command to toggle clock in/out.
useAcePermissions
If enableCommand is true, this will enable ace permissions for the specific command, must give command.whateverTheCommandIs
qbcore.use
Enables qbcore integration
qbcore.autoClockInJobs
Will automatically clock in/out the player's Sonoran CMS account with they clock in/out of a job with the name in the array of autoClockInJobs
esx.use
Enables ESX integration
Ensure all players have added their API ID to the CMS!
Use code SONORAN to save big!
After installation, learn about configuring the submodule features.
Click here to download the core resource.
Extract the [sonorancms] folder into your server's resources folder.
Open sonorancms\config.CHANGEME.lua, update the values, then save it as config.lua.
Default configuration is below:
Add the following to your server.cfg
It is very important that the sonorancms_updatehelper resource is not started manually. Doing so may cause a server crash if updates are available due to a race condition.
DO NOT start the whole [sonorancms] folder as that will also start the sonorancms_updatehelper which might cause crashing if it is started manually.
Example of what not to do: ensure [sonorancms]
The CMS Core resource comes with a variety of submodules included by default. These handle a variety of features such as whitelisting, permission synchronization, and more.
Sonoran CMS's core will automatically update with the latest features, fixes, and changes!
Check to make sure sonorancms_updatehelper is not being started in your server.cfg.
It is very important that the sonorancms_updatehelper resource is not started manually. Doing so may cause a server crash if updates are available due to a race condition.
CMS updates are released often. Make sure your server is running on the latest release.
If your community is using recommended Discord integration, ensure your Discord account is linked.
For other methods (Steam, FiveM License, etc.) ensure you have set your API ID in the CMS using the API ID that your community is looking for.
Some users will see this in their server console:
In the case of this error, please locate the file named .yarn.installed, open it in any editor, then save it (without modifying anything).
This updates the "date modified" value for that file, which should then allow it to build correctly.
If you are having trouble with this, feel free to reach out to us, our support team will be happy to help you!
This log message means there was an update to the sonorancms resource that contains a configuration update. All you have to do is copy the contents from the config.NEW.lua file into your current configuration file then delete the config.NEW.lua file and restart sonorancms to resolve this message.
If you are having trouble with this, feel free to reach out to us, our support team will be happy to help you!
Press Enter to search
Select the community to join
From there, users can select your community card in the My Communities section to log into your CMS.
All communities are given a free vanity URL formatted as <communityid>.sonorancms.com. This URL will directly load your community homepage, allowing users to login and join.
Communities with a Pro subscription can link a custom domain. This custom domain name will load the community homepage, allowing users to login and join.


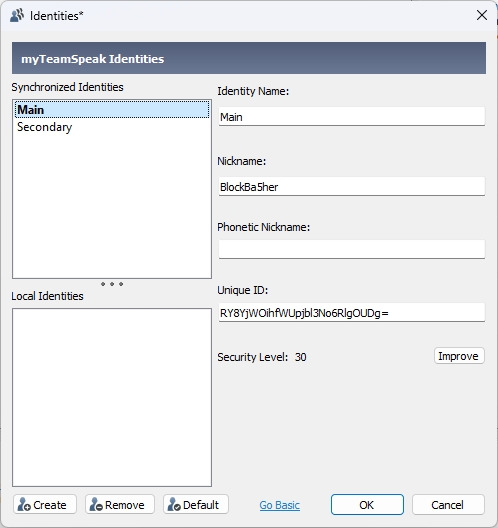
Is it time for you to start creating custom forms for your community? Follow this page for more information!
In the Forms panel, select the green + button to create a new form.
Form settings allows you to lock and unlock submissions, set submission limits, restrict submission permissions, customize the submission board title format, and add a description.
You can lock and unlock form submissions in the form settings, or from the main form editor panel. This prevents users from submitting new forms of this type.
The form icon/image is displayed in the available forms page and on .
Total: Restrict the maximum number of submissions per-user in the specified time window.
Cooldown: Specify the wait time between submissions within the specified time window.
Easily customize what user ranks have access to submit applications, view submissions, change the form stage, and more.
Customize submission titles on the form submission board with variables.
Click the </> icon to view available variables. Additionally, copy any form question ID (blue copy button on the question) and use that as a {variable} .
The form description is displayed at the top of the form when submitting. Additionally, the description will be displayed in when sharing a link.
Text masks allow you to force a specific format on form questions.
Ex: Mask (###) ### - #### forces the input to be all numbers, formatted as (123) 456 - 7890
Sections can be displayed conditionally, based on the answer or selection of a previous section's question.
Toggle the conditional section on, select the question it will be conditional on, and enter or select the values that must be met.
Form stages allow for automated actions when the form status/stage is changed.
Ex: When changing a user's membership application from Pending to Accepted you can send them an automated message, apply ranks, and more.
Stages can be customized in the submission board.
Select the desired form to view the available stages.
Stages can be reordered via drag-and-drop.
A new stage can be added by pressing the green + button at the end of the row.
An existing stage can be customized by hitting the gear icon.
The Actions tab allows you to customize automated actions that will occur when a submission is set to this stage.
Form stage actions can be conditional, meaning they will only trigger if a certain question response was selected.
The example action below shows that the email will only be sent if the form submitter selects Yes to the question Would you like us to email you more information?
Customize your community's settings, branding, information, and more!
Looking to remove Sonoran CMS branding on your website?
Branding RemovalThe admin customization info section allows you to customize your community's image, name, and more! These settings can be found by navigating to Administrative Panel > Customization
Custom community IDs require the Standard version of Sonoran CMS or higher. For more information, see our or view how to check your community .
Navigate to Administrative Panel > Limits Click the Change Community ID button and enter your new community ID.
Community IDs also customize your .
ID.sonorancms.com
Some communities may only want specific login methods to be available to their users. Each method can be enabled or disabled in the customization menu.
In the Name Customizations area, you can also set the automatic naming format for your community. The naming format determines how a user's name is displayed in the community (e.g. on their profile, form submissions, etc.).
In the above image, you can see that the name is displayed on the profile as John Doe | 1A. In this case, the user's Community Name is set as John Doe, and this user has an Identifier of 1A. To display those together like this, you would set the naming format to {comName} | {identifier}.
With the Sonoran Bot integration, you can enforce your CMS name format in your Discord Guild(s)!
Looking to separate shift types for players with multiple community positions? Add custom shift types in the customization menu. Players can select an optional shift type in the CMS timeclock menu, via the 's /clockin command, or from an .
When configuring rosters, you can select a specific shift type to be displayed in the timeclock hours column.
Sonoran CMS lets you define what happens when users join your community — from assigning specific ranks automatically to sending a welcome message via Discord DM. You have complete control over the actions that occur when new members join.
Customize your community's toolbar within the Sonoran CMS website builder!
Sonoran CMS allows you to customize the top toolbar with buttons to link your users to whatever your community needs.
To customize your community's toolbar head over to the Administrative Panel > Website Builder. From there you can add buttons, dropdowns and community image with various options.
To add a new button or dropdown, click the green plus button to add it to the end of your toolbar, or drag-and-drop the button to whatever position within the toolbar you'd like.
If you would like to reorder items in the toolbar, simply drag-and-drop them into their new position.
Each button and drop down option has a label and link associated with it, with these set they will be displayed to all community users.
If you make any changes, it will automatically save.
{
"enableCommand": true,
"command": "clockin",
"useAcePermissions": false,
"qbcore": {
"use": true,
"autoClockInJobs": [
"police",
"ems",
"fire"
]
},
"esx": {
"use": false,
"autoClockInJobs": [
"police",
"ambulance"
]
},
"cad": {
"use": false,
"note": "This will automatically clock in users when they enter a Police/EMS/Fire CAD panel. This will not correlate to the users actual in-game status, but will allow them to use the CAD without having to manually clock in."
},
"ranksWhileCadActive": [
"00000000-0000-0000-0000-000000000000"
]
}exec @sonorancms/sonorancms.cfg[ script:yarn] Error: [yarn] error @discordjs/[email protected]: The engine "node" is incompatible with this module. Expected version ">=16.11.0". Got "16.9.1"
[ script:yarn] Error: [yarn] error Found incompatible module.
[ script:yarn] [yarn] info Visit https://yarnpkg.com/en/docs/cli/install for documentation about this command.
[ citizen-server-impl] Building resource sonorancms failed.
[ citizen-server-impl] Error data: yarn failed!add_ace resource.sonorancms command allow### Ace Permissions
## Inheritance
add_principal group.admin group.mod
add_principal group.policesup group.police
## Permissions
add_ace group.admin command allow
add_ace group.mod admin.kick allow
add_ace group.policesup police.supcar allow
add_ace group.police police.car allowesx.autoClockInJobs
Will automatically clock in/out the player's Sonoran CMS account with they clock in/out of a job with the name in the array of autoClockInJobs
cad
When enabled, it will automatically clock the user in and out when logging into and out of Sonoran CAD.
ranksWhileCadActive
A list of CMS rank IDs that will be added when the user logs into Sonoran CAD and removes it when logging out of Sonoran CAD. This is used for restricting access to things like Sonoran Radio to only be available to users actively in the CAD.
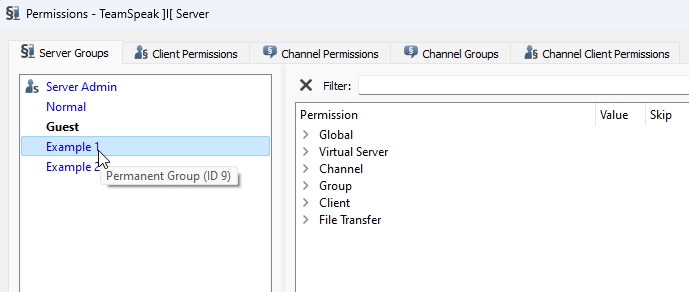


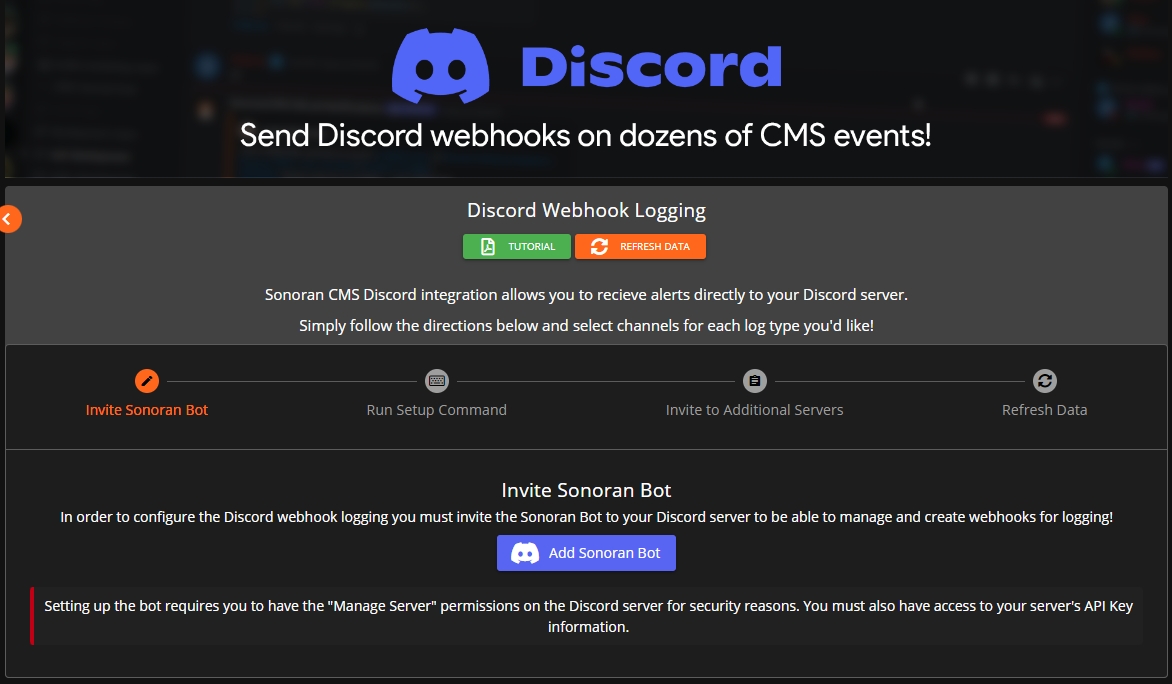
(5) Section Header
(7) Question Title
(8) Question Type (Text, select, etc.)
(9) Add Section
(10) Add Question
(11) Question Subtext
(13) Clone Field, Remove, and Required
x
Alphanumeric, transformed to lowercase for letters
#
Numeric
S
Letter, a to z, case insensitive
N
Alphanumeric, case insensitive for letters
A
Letter, transformed to uppercase
a
Letter, transformed to lowercase
X
Alphanumeric, transformed to uppercase for letters


To prevent abuse, communities are limited to 100 AI form processes per day. If your community is actively (or realistically intends to) surpass this limit with legitimate traffic, contact our support team!
Stop wasting time manually reviewing applications. With Sonoran CMS, your community can set custom rules to automatically score forms and seamlessly move them through the right workflow stage.
When a form enters a specific stage (e.g., Awaiting Review), you can define how the AI should evaluate the submission’s responses. Based on the scoring criteria you set, the AI will automatically advance the form to the next stage—such as Accepted or Denied.
For each section of your form, you can define criteria for the AI to score responses. Criteria can be marked as required or preferred, and each section can be assigned a scoring weight to determine its importance. Every section visible to the user (see: form dependencies) will be scored.
To set this up:
Select Add Section.
Choose the section from the drop-down.
Assign a weight (how much this section should influence the overall score).
Add your custom criteria.
Some criteria can act as deal-breakers. For example, if applicants must be 18+ regardless of other answers, mark that criterion as required.
In the Scoring section, the dropdown lets you specify a stage if any required criteria are missed. For example, if your application requires applicants to be 18+ but the user is underage, the form can automatically be moved to the Denied stage regardless of other responses.
Rules are applied according to their hierarchy and can be reordered using drag-and-drop.
Next, define the scoring rules that determine how forms progress:
Select Add Rule.
Enter the minimum score.
Enter the maximum score.
Choose the form stage to move to.
Account Flags are added when alternate accounts are detected.
Disciplinary Points are assigned by staff when users have prior infractions.
For example, you may want to prevent a form from being automatically accepted if the applicant has a flagged account or too many disciplinary points.
When the AI updates a form’s stage, it will leave a private comment on the submission explaining its scoring rationale. These private comments are visible to anyone with the Access Private Comments permission on that form.
Additionally, the AI’s reasoning and score % can be included in any stage action—such as a Discord webhook—to provide context on why the form was advanced to a new stage.
To prevent abuse, all Pro communities are limited to 100 AI form submissions per 24-hour period. Current usage can be tracked in the Community Limits panel.
If your community requires more than 100 submissions within 24 hours for legitimate purposes, please contact our support team to request an increased limit.
AI form processing is a powerful way to handle the majority of submissions. It can quickly filter out low-quality responses and highlight the best applications.
For critical applications—especially those that automatically add or remove ranks—it’s recommended to route them to “Likely Accepted” or “Likely Denied” stages. This ensures the AI speeds up the process while still allowing a final human review before a decision is made.
Account Flags help protect your community against alternate accounts and ban evasion. If an applicant has active flags on their account, it’s recommended to route their submission to a Manual Review stage for further investigation before approval.
Because AI-powered forms can be processed in seconds, it’s important to guard against abuse. To prevent users from “brute forcing” submissions, communities can set limits on how often a form type can be re-submitted.
The form editor provides two control options:
Submission limits – Set a maximum number of submissions allowed within a defined timeframe.
Cooldown period – Require a minimum waiting time between individual submissions.
The orange Header Design button opens a menu that will let you customize the group alignment, background color and admin cog setting. You can also drag and drop elements to change the display order.
You can also customize the title, font, color and specific links for any button or dropdown menu. To open the design panel, simply click on any button or dropdown in the Toolbar Customization editor.
With dropdowns, you can also customize not only the styling of the dropdown button itself, but of every option within the dropdown. This is also where you go to add any destination links within the dropdown.
Within any button or dropdown you are give the option to link a variety of different things, from another page in the community, to external pages, to documents in your community's drive to management panels and more!
In the design panel of any button, you can customize where said button links to by clicking on the Target tab in the design panel
To add options to a dropdown menu, simply click the green plus button in the Options tab of the design panel.
From here, you can select the destination of the link using the chain icon:
Toolbar items that lead to permission-restricted areas (such as private pages or admin panels) automatically show or hide based on whether the user has access to the destination.
Access to specific toolbar link destinations can be configured in the rank manager.
This button/icon of the navigation toolbar is based upon the CMS Permissions > Clock In & Out permission.
This navigation item is based upon the Page Permissions > View Page permissions.
This navigation item is based upon the CMS Permissions > Modify All Documents (Drive) permission or the Navigation Pages > View Drive Navigation Button permission.
This navigation item is always present for all members of your community if within your toolbar.
This navigation item is based upon the Navigation Permissions > View Calendar Navigation Button permission.
This navigation item is based upon the Navigation Permissions > View Rosters Navigation Buttons permission.
This navigation item is based upon the Form Permissions > View Submitted permissions, if at least one View Submitted permissions is granted the item will show.
This navigation item is based upon several permissions within the CMS Permissions section.

debug_mode
When set to true, useful debugging information it outputted to the console.
Keep disabled in production due to console spam.
apiUrl
Default: https://api.sonorancms.com/
apiIdType
Type of api ID the core script should be searching for: discord, steam, license, etc.
serverId
Default: 1 - ID of the Sonoran CMS server that this core resource should be tied to.
framework
none, qb-core, or esx
MaxInventorySlots
If using framework: qb-core you can specify the max inventory slots your inventory resource supports, this is for inventory management via the Game Panel's within Sonoran CMS.
restartWithPlayers
When set to true, it will auto-update the resource and restart it even if players are present on the server.

Community Logo
A link to your community's logo.
This will be displayed on your community card, community dashboard, and more!
Community Name
This is your community's name.
This will be displayed on your community card and community dashboard.
Community Subtitle
This is the text displayed below your community name on your community card.
Name Customizations
This allows customization of how community names are formatted. Many RP communities use a specific naming style.
Example: Format: {uniqueId}
Allowed Login Methods
This controls which login methods are available for signing into the CMS community. For example, if you only want users to log in with Discord, you can disable all other options.
On Join Actions
This configures automatic actions that occur when new members join your community.
Community Name
{comName}
Identifier
{identifier}
Unique ID
{uniqueId}


Dashboard
View your server statistics right from the CMS QB Core management panel!
Players
Manage in-game players with the CMS QB Core management panel!
Vehicles
Manage in-game vehicles with the CMS QB Core management panel!
Whitelisting
Automate whitelisting in your server with the CMS QB Core management panel.
Logs
View server logs with the CMS QB Core management panel!
Characters
Manage in-game characters with the CMS QB Core management panel!
Jobs
Manage in-game jobs with the CMS QB Core management panel!
Gangs
Manage in-game gangs with the CMS QB Core management panel!
Items
Manage in-game items with the CMS QB Core management panel!
Resources
Start, stop, and ensure in-game resources with the CMS QB Core management panel!
Aces and Principals
Manage in-game ACE permissions with the CMS QB Core management panel!
Environment
Manage in-game weather and time with the QB Core management panel!


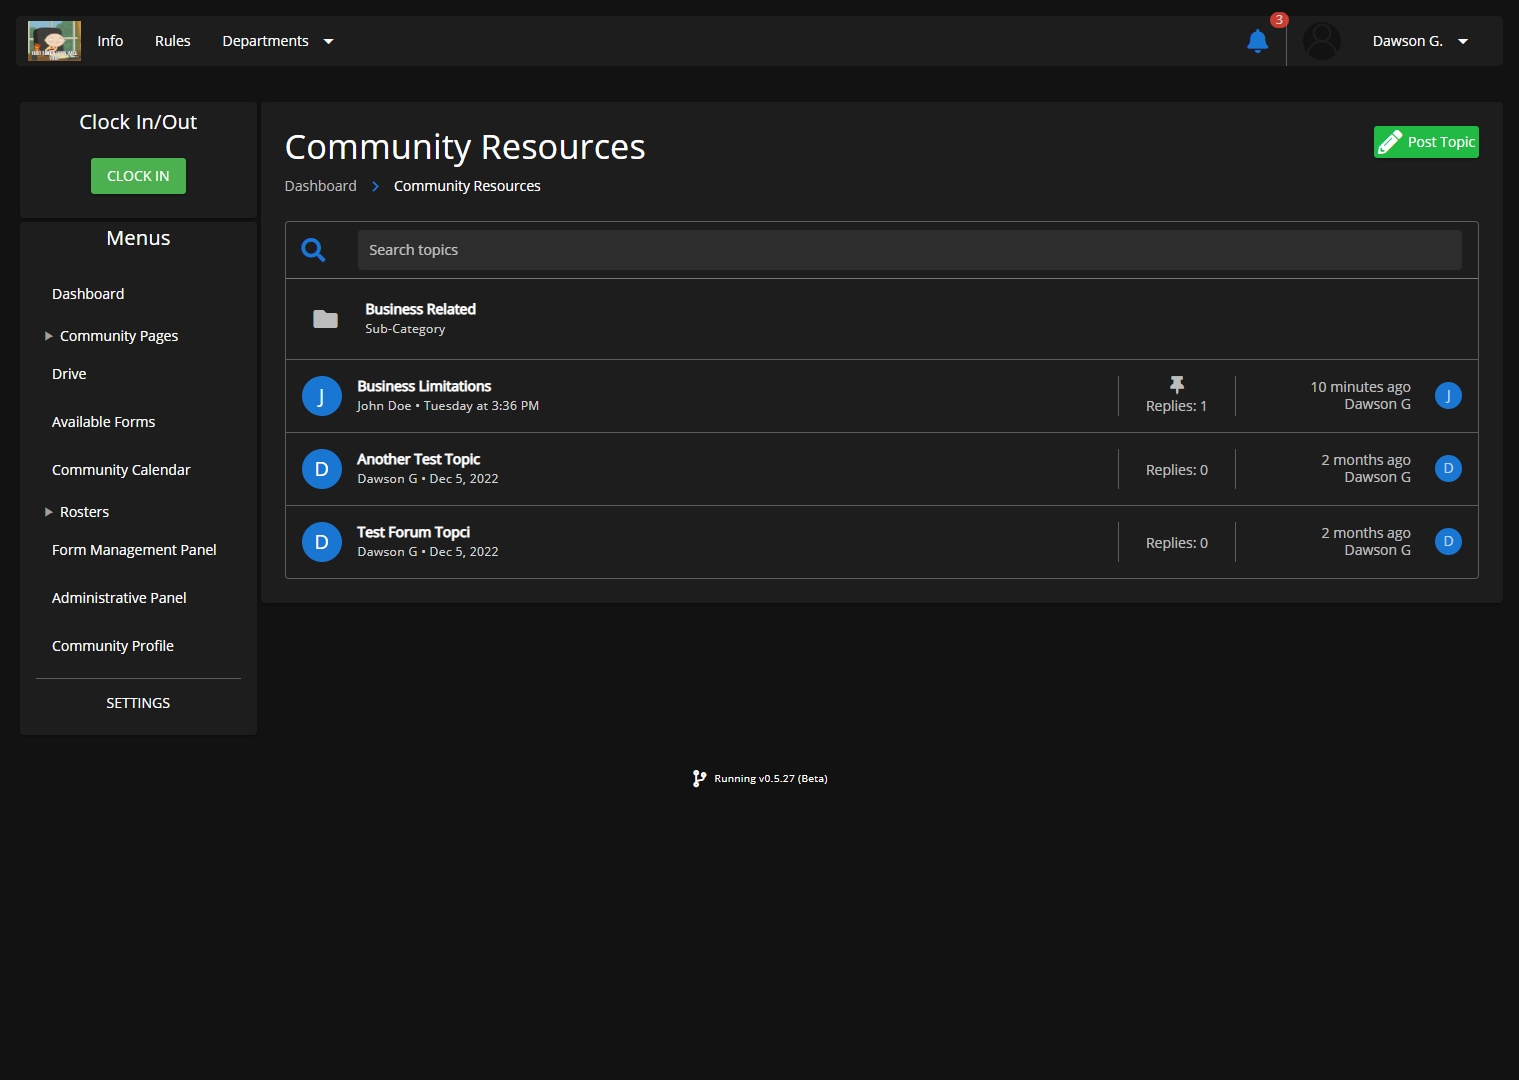
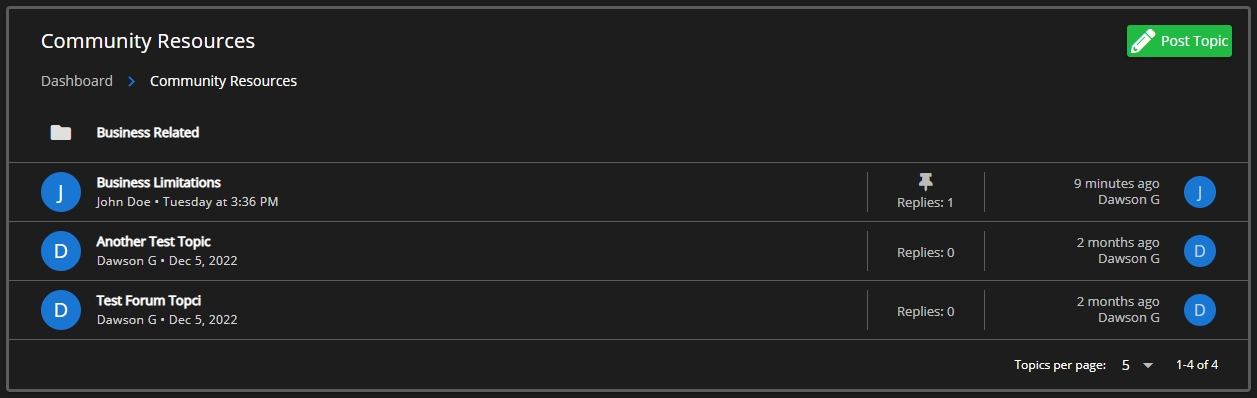
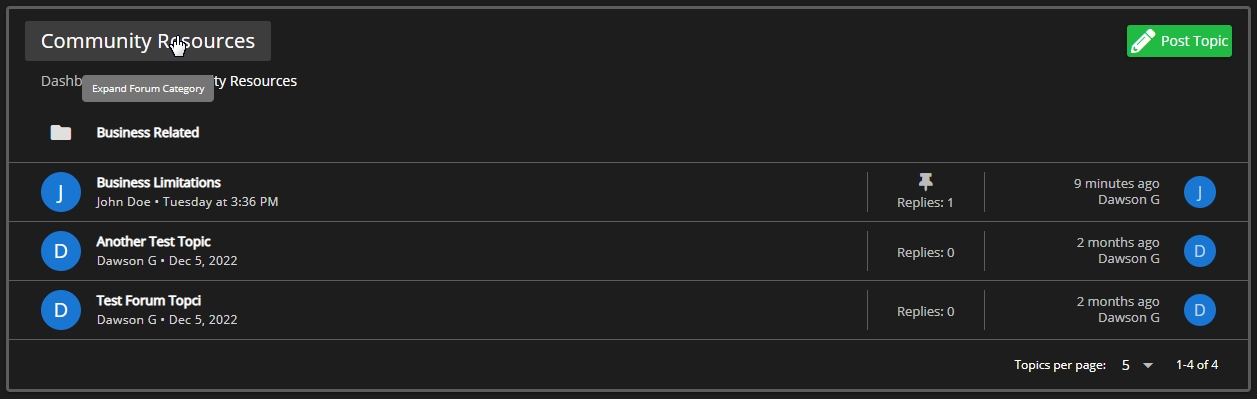
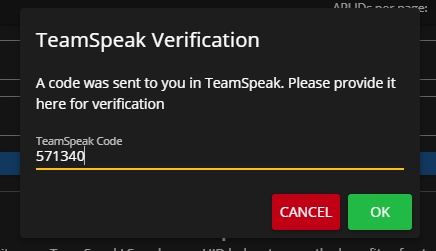
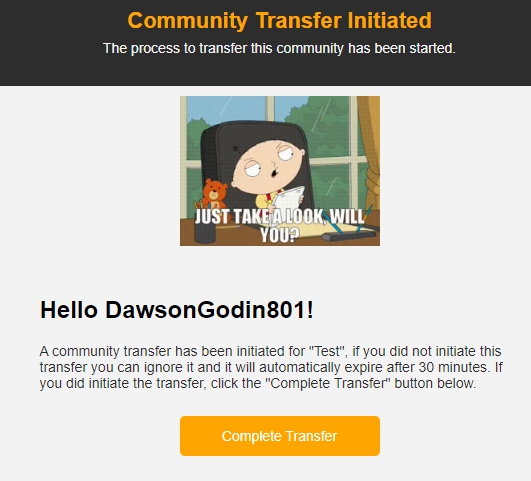

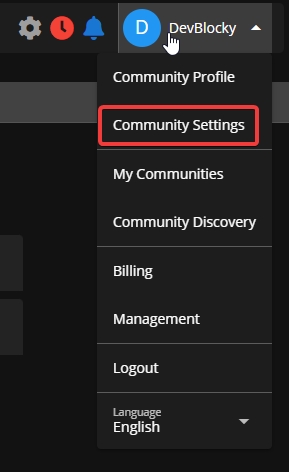
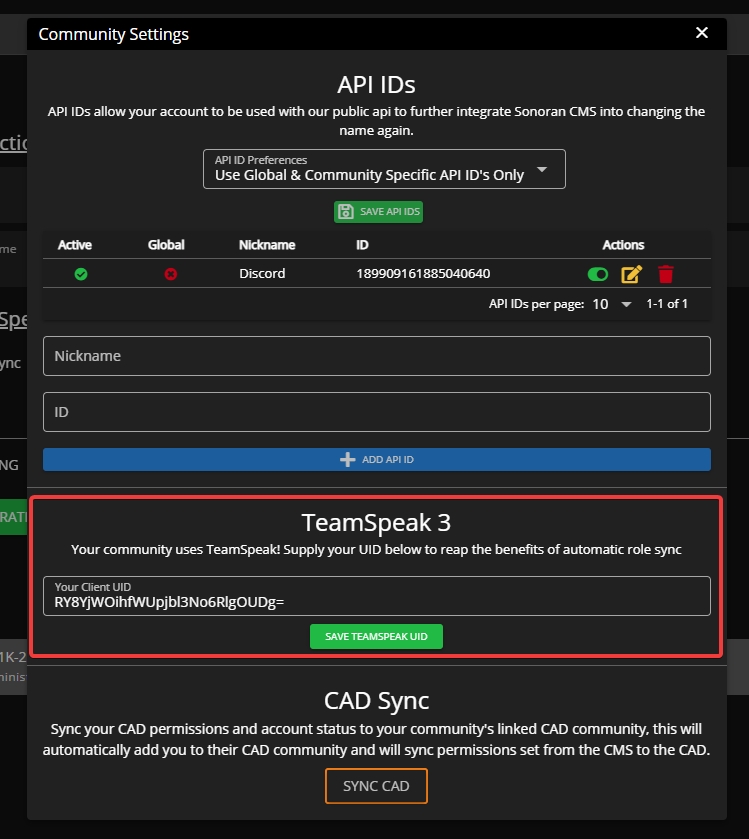

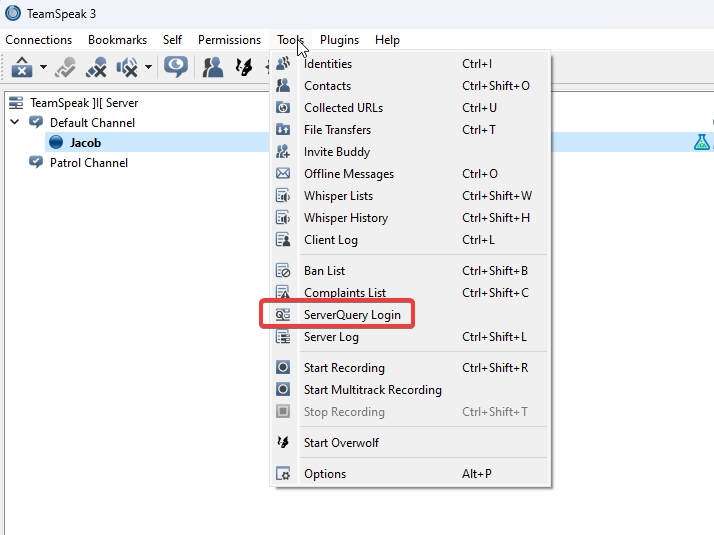
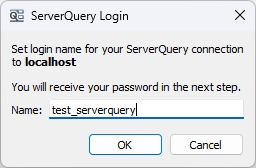
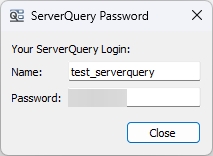

Create your own community website entirely within Sonoran CMS!
To access the website builder, navigate to Administration Panel > Website Builder
To start editing a page, either add a new page or click on an existing page in the page to open up the page editor.
Once your page is created and saved, you can or copy the URL to access it.
To add sections to your web page, simply drag and drop your desired section type in from the left hand side. The following section types are available to use:
From the website builder's toolbar you can change the page's title, path slug, and privacy setting. Additionally, you're able to add new sections, and change the preview size of the editor to visualize different size settings.
The device preview feature allows you to choose from a list of devices, or set your own custom resolution to give you further control over designing your community's website with mobile responsiveness in mind!
Sections are containers for elements that exist within a webpage. You can add multiple sections and resize / move them however you'd like.
You can customize the margin and background styling of specific sections.
Margin refers to the space outside an section. It can be used to create space between sections on a page or to push elements away from the edges of the page. In your page editor, you can change margin options for different areas, such as top, bottom, left and right.
You can also dynamically resize and position sections by clicking any of the boxes around the edges and dragging them to your desired position.
There is also a button at the top of the section that allows you to click and drag to move the section:
You can also control the size of individual elements using the same method above, and you can click and drag to move any element wherever you'd like.
Elements will also snap to center lines within their respective section to assist with positioning.
In the top right corner of the button element above, you can see an orange lock icon. This means that this element is locked to the section its in. To move an element to another section, you can click this button to unlock the element, drag it to the section you desire, and then re-lock it.
If you wish to add buttons to your page, you can add a button or button group section to your page. Each button has several settings that define how the button looks like and acts. Each button can be direct users to external websites, custom forms and custom pages.
Button elements can have individual styles and button group elements can have all group styles.
You can customize by clicking on it. The styling of a button is set in the Styles tab, the target link a button leads to is set in the Target tab.
For Button Group elements, you can add as many target links as you need, and re-order or delete them using the controls on the top right of each entry.
Pages can now be privatized and require permissions to view. When editing a page, you can select whether the page is public (and can thus be viewed by anyone in the community) or private.
If it's set to Private, you can use the dropdown to the right to select what ranks are allowed to view this page.
Sonoran CMS allows you to easily customize the landing page/dashboard for your community, this page is the first page your members will see from signing into your community. This allows the full customization of a custom page for your landing page.
To set a Custom Page as your homepage, navigate to the main page for the Website Builder and look under the section titled Website Pages. Locate the page you wish to use as your homepage and press the grey gear icon then the grey home icon, this will turn it orange and set it as the landing page.
Custom Pages can now have a custom path to the page, this path will append to the Sonoran CMS URL. If you're using a custom domain it'll detect that and provide the proper URL.
Clicking on the cog on the right side of the Page Title box will open the SEO panel. Here you can set a custom image and description for the website's page. These will show in embeds, such as when you paste the link in Discord.
If you have a Standard subscription or higher, the "Sonoran CMS" branding in the title will be removed.
Please be aware that Discord will locally cache the embed info - so updates may not show right away.
Additionally, there are third party sites such as that can be used to check your page's "meta" tags and show it, without caching like Discord would. After you've saved the page, you can use this to verify that the image and description display how you want.
Sonoran CMS allows you to display your community website !
Sonoran CMS allows you to with buttons to link your users to whatever your community needs.
HTML elements get sanitized before they're saved, displayed or manipulated.
Allowed Tags: A wide range of HTML tags for different purposes including:
Structural elements like header, footer, main, nav, section.
Just like Google Drive or Microsoft Office, create and store documents in your community's drive!
With your drive, you're able to create files and folders for your community. These files are completely customizable, and have a similar style editor to the Microsoft Office suite
This feature is currently experimental. It is known that phones and other small devices may not have the best compatibility with editing/viewing files
You can navigate to your drive using the Drive button on the menu sidebar. Once in the drive, you'll see all created documents! If you have permission to edit/create documents, then there will be some additional buttons for you
To quickly manage Drive items you can right click the item, it'll provide a menu of actions that can be performed on that item.
Folders help you organize your community's drive! To create folders, just use the green plus button, then drag n drop files into the folders. You can also drag n drop files on the breadcrumbs on the top
To move a file without drag n drop, you can right click the document then Move to Folder and select the folder in the popup.
Folders have share settings with them to determine who can view/edit via the direct link. To edit a folder's share settings you can right click the folder and select "Share Settings".
You can change the view mode between grid and list by using the orange toggle button at the top right of the drive.
You're able to create multiple document types, from presentations to excel sheets to word files!
If you have access to modify documents, then you'll be able to create/edit/delete them.
To edit a document, press the three orange dots then Open.
To delete a document, press the press the three orange dots then Remove
To create a document, press the green plus button that says New.
Editing documents is simple. On the editor page, you can modify the content, rename the file, adjust sharing settings, and manage if the info is sensitive.
To rename the page, simply type the new name and press the checkmark.
To change share settings, simply right click the file and select "Share Settings". If you're editing the document already you can simply click the "Share Settings" icon on the top right.
Ranks with All Drive Access
This shows all ranks that have the "Modify Documents (Drive)" permission, this will automatically grant them permission to modify this drive item.
Ranks with Access Permissions
This shows all ranks that have been added to have direct view or edit access regardless of what the General Access share type is set to. If a user has a rank listed here the drive item will show in their Drive as well. You can select what ranks you wish to give access permissions and whether they're given permission to view or edit.
General Access
This allows for various share settings to be applied to the drive item from a single selection. There's various options that will grant members access automatically, the options are the following:
Restricted
This will only utilize the Ranks with All Drive Access and Ranks with Access Permissions to determine if they have access to the document.
Anyone with this link
This will allow ANYONE with the share link provided with the button to either view and/or edit the file, depending on what it set. You can click the icon on the left to either hide or show the drive item in your community member's Drive, if you have it hidden they'll still have access to either view or edit depending on what's set directly through the share link. Someone who is not apart of your community's CMS or even signed into Sonoran CMS will be able to view and/or edit through the share link provided.
Active members with this link
This will allow all users with the community status of "ACTIVE" not "PENDING" to either view or edit the drive item, depending on what's set. You can click the icon on the left to either hide or show the drive item in their Drive, if you have it hidden they still have access to either view or edit depending on what's set directly through the share link.
Active & pending members with this link
This will allow all users within the community to either view or edit the drive item, depending on what's set. You can click the icon on the left to either hide or show the drive item in their Drive, if you have it hidden they still have access to either view or edit depending on what's set directly through the share link.
Inherit Parent Folder General Access
This will inherit the parent folder's general access settings, this will simply inherit whatever option from above the folder is set to.
You can also change the sensitivity of the document. With sensitive mode enabled, viewers will not be able to download, print, or copy the document. A watermark will also be added.
Due to limitations with the editor, it's not able to save automatically. To save, you can press the floppy-disk icon on the top left or press CTRL+S
A warning will be shown if you try to leave the page with unsaved changes
The editor allows multiple people to edit the same document at the same time! No special instructions needed, all you need to do is load up the editor and it'll handle the magic
Sonoran CMS easily allows you to upload individual files, multiple files via a ZIP. This will allow your community to easily migrate community documents and assets easily over from standard document hosting services such as Google Drive!
As shown in the image above, navigate to the Sonoran CMS Drive, click the green plus button, and then select Upload File. From there, you'll be able to select a file with the following type:
.docx Document
.xlsx Spreadsheet
.pptx Presentation
Once you select the file(s) you'd like to upload click the white cloud upload icon to the right of "Upload Document". This will now upload the file and alert you once it's completed.
As mentioned above you can upload / migrate complete directories from standard document hosting services such as Google Drive.
While in the Sonoran CMS Drive click the green plus button, and then select Upload Zip.
From there you'll be able to select a ZIP file, keep in mind that the following file types will be the only ones recognized by Sonoran CMS once uploaded.
.docx Document
.xlsx Spreadsheet
.pptx Presentation
Once you select the file(s) you'd like to upload click the white cloud upload icon to the right of "Upload Document". You will get alerted for all the files that were successfully uploaded from the ZIP and which ones were rejected with reason.
Migrating files from Google Drive to the Sonoran CMS is very easy! All you need to do is go to your Google Drive, locate the directory or select a group a files that you're wanting to migrate and right click, you'll be given several options, click the "Download" option. This will now generate and download a ZIP file containing all files/directories that you selected. Now just follow the directions that were put above to complete migrating over files.
Sonoran CMS Drive allows files to be publicly viewable and editable with a simple share setting change and sharing the generated share link. When a file's general access is set to "Anyone with this link" it will allow anyone with that generated link access to view or edit the file. This will not require the user to sign in or to be part of your community.
If a user of your community accesses the public generated link they will be automatically redirected to view the file in your community's Drive.
There are several file types that the Sonoran CMS Drive accepts but only handles them as downloadable content that isn't for viewable use. The following file types are currently supported for downloadable content:
.rpf GTA Archive
.wav, .mp3 Audio
.zip ZIP
When one of these file types are uploaded they'll be given different options to interact with, as shown in the image you're able to download, remove or modify the share settings. Additionally you're able to copy a direct download link to share among peers. If someone is able to see the file in their Drive they're able to download it.
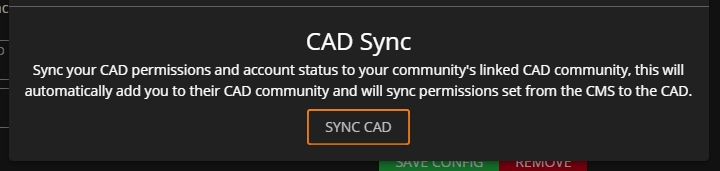
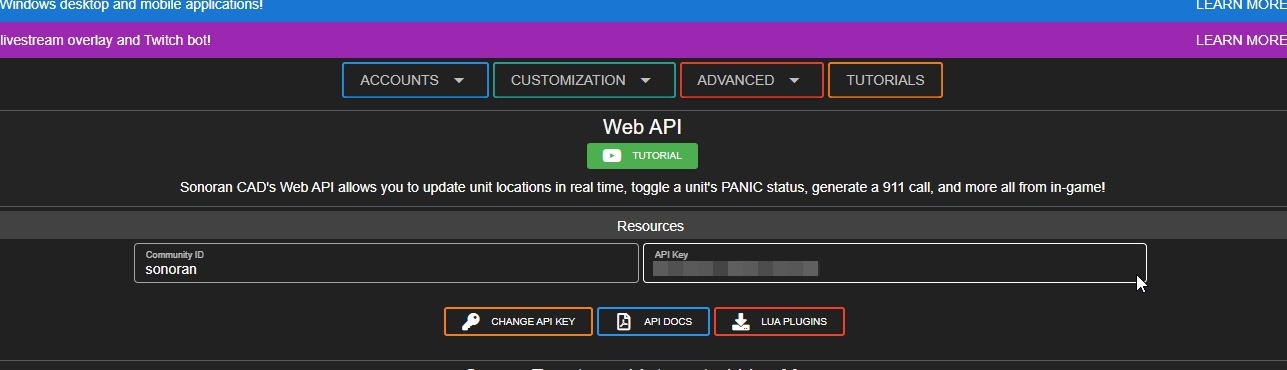
Button Group
Button Group sections allow you to have a group of buttons together on your page that can be directed to an external page, custom form, or custom page.
Card
Allows you to add and customize "cards" which can be configured to display information on members or characters as well as links.
Information Block
Information Block sections allow you to add multiple blocks to provide information for, these can be configured to grab "Total Community Members", "Total Department Members" or "Custom". "Custom" allows for customizable text.
Gallery
Gallery sections are the first element for the gallery system, this allows you to show all posts in the gallery category.
HTML
If you know HTML you can further customize your page by directly adding HTML code. To edit the HTML you must click on the element and input your HTML into the text box for. Please not you are .
h1 through h6, strong, em, b, i.List elements like ul, ol, li.
Table components including table, th, td, thead, tbody, tfoot.
Media embedding tags img and iframe.
Inline elements like span, br, mark, small.
Text semantic tags such as time, code, var, samp.
Attributes:
Allows style universally.
For a: href, name, target.
For img: src, srcset, alt, title, width, height, loading.
For iframe: src, height, width, name.
Styles:
Basic layout and visual styling such as width, height, border, padding, margin, background, display, opacity, overflow and visibility.
Specific regex patterns are set for color, text-align, and font-size to control text styling and coloring with precise formats.
Text
The text section includes a rich editor for including blocks of text. In this editor, you are able to set font sizes, bold, italic, underline, strike-through, and more!
Image
Image sections allow you to insert one image into your page, just paste a link to the image in the text box.
Image Carousel
Allows you to insert multiple images in the space of one, automatically cycling between them.
Video
The video section can be used to insert YouTube links into your custom page, just paste a regular YouTube link (or a shortened one) into the text box.
Forum Category
Forum Category sections allow you to have a section to display all associated posts to the selected forum category.
Button
Button sections allow you to put individual buttons on your page that can be directed to an external page, custom form, or custom page.


.pdf PDF
.mp3 Audio
.wav Audio
.rpf GTA Archive
.pdf PDF
.mp3 Audio
.wav Audio
.rpf GTA Archive
.pdf PDF