Smart Lighting requires the Pro version of Sonoran Studio and the Windows or macOS desktop app.
What are Smart Lights, Outlets & Buttons?
Sonoran Studio controls RGB light color and power, smart outlet on/off state, and SwitchBot Bot actions in each scene frame. With the FiveM, LSPDFR, and ER:LC integrations, you can build custom patterns for emergency lights, hazards, and turn signals. The same realtime Sonoran CAD and Radio events that power Studio widgets can trigger device sequences for transmissions, unit updates, calls, dispatch activity, and panic changes.Supported Devices
Studio only lists devices that expose the controls required by the selected provider. A product having Wi-Fi, Bluetooth, Matter, Alexa, or Google Home support does not by itself guarantee compatibility. Amazon links point to an exact product page when the model could be verified. Links marked Amazon search open a model-specific search; confirm the model or family shown below before ordering. As an Amazon Associate, Sonoran Software earns from qualifying purchases.Smart Lights
Wyze Color
Wyze Color
Wyze connects through the Wyze cloud and requires the four account values shown in Studio.
Setup
- Add each color bulb or lightstrip in the Wyze app and confirm it is online.
- Open the Wyze developer console, sign in with the same account, and create an API key.
- In Studio, select Wyze Color and enter the Wyze email, password, key ID, and API key.
- Select Connect Wyze & find lights. The credentials are encrypted on this computer; use Re-login if they change.
- Wyze Bulb Color A19, 2-pack
- Wyze Bulb Color BR30, 2-pack
- Wyze Light Strip (Amazon search)
- Wyze Light Strip Pro
Philips Hue
Philips Hue
Philips Hue uses the local Hue Bridge API. A Hue Bridge is required, including for products that can also connect over Bluetooth. Studio supports Hue lights that report full color controls; buy the White and color ambiance version, not White or White ambiance.
Setup
- Add the Hue Bridge and color lights in the Hue app and confirm every light works.
- Keep the Bridge and Studio desktop app on the same local network.
- Press the round link button on top of the Hue Bridge.
- In Studio, select Philips Hue, leave the optional fields blank, and select Connect Hue Bridge. Studio discovers the Bridge and creates a local API username. Advanced users may enter an existing Bridge IP and API username instead.
- Starter kit with Hue Bridge and color bulbs
- Single color bulb
- Color bulb 4-pack
- Hue Lightstrip Plus base kit
- White and color ambiance BR30 (Amazon search)
- Gradient lightstrips (Amazon search)
- Play light bars (Amazon search)
- Hue Go (Amazon search)
- Hue Iris (Amazon search)
- Hue Bloom (Amazon search)
- Hue Signe (Amazon search)
Govee Wi-Fi
Govee Wi-Fi
Govee connects through the official cloud API and requires a Govee API key. Studio only displays devices for which Govee reports both
powerSwitch and colorRgb. This capability check is more reliable than assuming every product in a family supports the API.Setup
- Add every light in the Govee Home app and confirm it is online over Wi-Fi. Bluetooth-only products cannot use this connection.
- Sign in to the Govee developer portal with the account that owns the lights and request an API key.
- In Studio, select Govee Wi-Fi, paste the API key, and select Connect Govee & find lights.
- Studio lists only devices whose API capabilities include both RGB color and power control, then loads the built-in scenes, DIY scenes, and snapshots Govee exposes for each compatible light.
- H6008 A19 bulb — 4-pack on Amazon
- H605C Envisual TV Backlight T2 — 75–85 inch kit on Amazon
- H607C Floor Lamp 2 — Amazon
- H6062 Glide RGBIC 3D Wall Light — Amazon
- H7055 Outdoor Pathway Lights — Amazon search
Nanoleaf
Nanoleaf
Nanoleaf uses its local OpenAPI on port
16021; no cloud account or hub is required. Enter the light’s IP address or local hostname in Studio. In the Nanoleaf app, choose Connect to API, or hold the controller power button for 5–7 seconds, then select Pair & find Nanoleaf within 30 seconds.Setup
- Put the Nanoleaf device and Studio desktop app on the same local network, then find the device IP in the Nanoleaf app or your router.
- Open the pairing window by choosing Connect to API in the Nanoleaf app or holding the controller power button for 5–7 seconds.
- In Studio, select Nanoleaf, enter the IP address or local hostname, and leave the token blank for first-time pairing.
- Within 30 seconds, select Pair & find Nanoleaf. Studio saves the returned local token; an existing token may be pasted when reconnecting.
- Shapes, Canvas, Lines, Light Panels, and Skylight (Amazon searches)
- Holiday String Lights NL71K1/NL71K2 — Amazon search
- Indoor HD Lightstrip NL72K1 — Amazon search
- Indoor Lightstrip NL72K3 — Amazon search
- Floor Lamp NL72K4 — Amazon search
- Rope Lights NL72K6 — Amazon search
- Outdoor String Lights NL73K1 — Amazon search
- Permanent Outdoor Lights NL73K3 — Amazon search
- Wi-Fi A19 bulb NL75K1 — Amazon search
LIFX
LIFX
LIFX connects directly over the official local LAN protocol. No LIFX cloud token, account sign-in, or hub is required. Keep the Studio desktop app and the lights on the same local network, then select Scan local network for LIFX.
Setup
- Add the color lights in the LIFX app, update their firmware, and confirm they can display RGB colors.
- Keep the lights and Studio desktop app on the same local network. Guest Wi-Fi or client isolation must be disabled between them.
- Allow local UDP port
56700through the computer firewall if discovery traffic is restricted. - In Studio, select LIFX and then Scan local network for LIFX. No account, hub, address, or token is required.
color: true. This covers the RGB versions of LIFX Color A19/A21/BR30/GU10 bulbs, Mini Color, Clean, Downlight, Z/Lightstrip, Beam, Tile, Candle Color, Neon, String, Ceiling, Spot, Path, PAR38, Tube, Luna, Mirror, and RGB outdoor families in the current registry.Amazon links for registry-backed RGB families:- Color A19 1100-lumen, 2-pack
- Color A21, Color BR30, and Color GU10 (Amazon searches)
- Mini Color, Clean, and Color Downlight (Amazon searches)
- Z/Lightstrip, Beam, and Tile (Amazon searches)
- Candle Color, Neon, and String Lights (Amazon searches)
- Ceiling, Spot, and Path (Amazon searches)
- Color PAR38, Tube, and Luna (Amazon searches)
- Mirror and RGB outdoor families (Amazon searches)
56700. Studio requests an acknowledgement for every command and retries a missing acknowledgement once. LIFX warns clients against excessive LAN message rates but does not publish a numeric request ceiling, so Studio serializes commands per light. Start with frame delays of 100 ms or longer and increase the delay if Wi-Fi is congested. See the official LAN discovery guide, SetColor/SetPower messages, and packet header specification.WLED
WLED
WLED connects directly to each controller’s local JSON API. Studio requires WLED
0.13 or newer so it can verify that at least one segment reports RGB capability. Enter the controller’s IP address or local hostname; separate multiple controllers with commas.Setup
- Install WLED
0.13or newer, configure the controller and LED output, and verify RGB colors from the WLED web interface. - Open the WLED Info screen, WLED app, or router and copy the controller’s IP address or
.localhostname. - In Studio, select WLED and enter the address. Separate multiple controllers with commas.
- Select Connect WLED controller. Studio verifies RGB capability and represents each controller as one light controlling all configured segments.
tt: 0 transition for immediate changes. Use frame delays of 100 ms or longer for reliable animations, especially with several controllers. See the official WLED JSON API and getting-started guide.Smart Outlets
Wyze
Wyze
Wyze connects through the cloud. Studio supports Wyze Plug and each independently exposed outlet on Wyze Outdoor Plug. Use the same Wyze email, password, key ID, and API key described above.
Govee
Govee
Govee connects through the official cloud API key. Supported outlet models are H5080, H5081, H5082, H5083, and H5086.
Shelly
Shelly
Shelly works locally with Shelly Plus Plug US and Gen1, Gen2+, Gen3, or Gen4 devices that expose relay or switch outputs. Studio discovers Gen2+ devices through local mDNS. Enter an IP address or hostname for Gen1 devices. No hub or cloud connection is required. Device authentication must be disabled.
SwitchBot
SwitchBot
SwitchBot supports Plug, Plug Mini (US), Plug Mini (JP), and Plug Mini (EU). It uses official OpenAPI v1.1. Enter the token and secret from Developer Options. An internet connection is required.
Button Pressers
SwitchBot Bot
SwitchBot Bot
Studio supports the SwitchBot Bot through SwitchBot’s official OpenAPI v1.1. Configure the Bot’s mechanical movement and operating mode in the SwitchBot app. The Bot must be connected through a SwitchBot Hub with Cloud Services enabled so it appears through the API.
- In the SwitchBot app, add the Bot, connect it to a Hub, and configure it as Press Mode, Switch Mode, or Custom Mode.
- Enable Cloud Services or Third-party Services for the Bot.
- Obtain the account token and secret from Developer Options in the SwitchBot app.
- In Studio, open Other, select SwitchBot, enter the token and secret, and select Connect SwitchBot & find Bots.
press, turnOn, or turnOff command when that frame runs. See SwitchBot’s official Bot API reference.Provider Timing Reference
Creating Device Sequences
Device sequences tell Studio which lights, outlets, or button pressers to use and how long each frame remains active. Each game or CAD/Radio widget event has its own saved sequence.
- Choose a game source
Open Smart Lighting in the Sonoran Studio desktop app. Under Choose your game, select FiveM, LSPDFR, or ER:LC. The scene editor shows the persistent lighting states supported by that game, FiveM/LSPDFR gameplay moments when available, and the CAD and Radio widget events.
- Connect your devices
Under Connect devices, choose your provider and follow the connection steps. After Studio discovers the devices, they are available in every scene and frame.
- Select the event
Under Build event scenes, use Scene event to select the event family you want to configure, such as Emergency lights, Health threshold, Transmission started, Status changed, or Panic changed. When a family has multiple choices, Studio adds a second selector beside it. Every final event choice saves a separate sequence.
The grouped choices are:
- Status changed: Any status, Available, Unavailable, Busy, En route, or On scene.
- Transmission started / ended: My transmission, Other user transmission, or Any transmission. A configured scoped scene takes priority; otherwise Studio falls back to the matching Any transmission scene.
- Radio emergency call: Ringing or Talking.
- Panic changed: Started or Ended / cleared.
- Health threshold: Drops below or Recovers above, with the 0–100 percentage box beside the selector.
- Build the frames
The first frame is created for you. Select smart lights with colors and power, smart outlets with on/off state, or SwitchBot Bots with their available Press, On, or Off action. When compatible Govee lights report scenes, a separate Govee scenes area appears below the device list. Select a built-in scene, DIY scene, or snapshot card to assign that specific light and effect to the active frame. Then set Delay to next frame in milliseconds.
Select Add frame to copy the selected frame, then change its devices, colors, states, or delay. Drag frame cards to reorder them. A sequence can contain up to 40 frames, and each frame delay can be between 50 and 60,000 milliseconds.
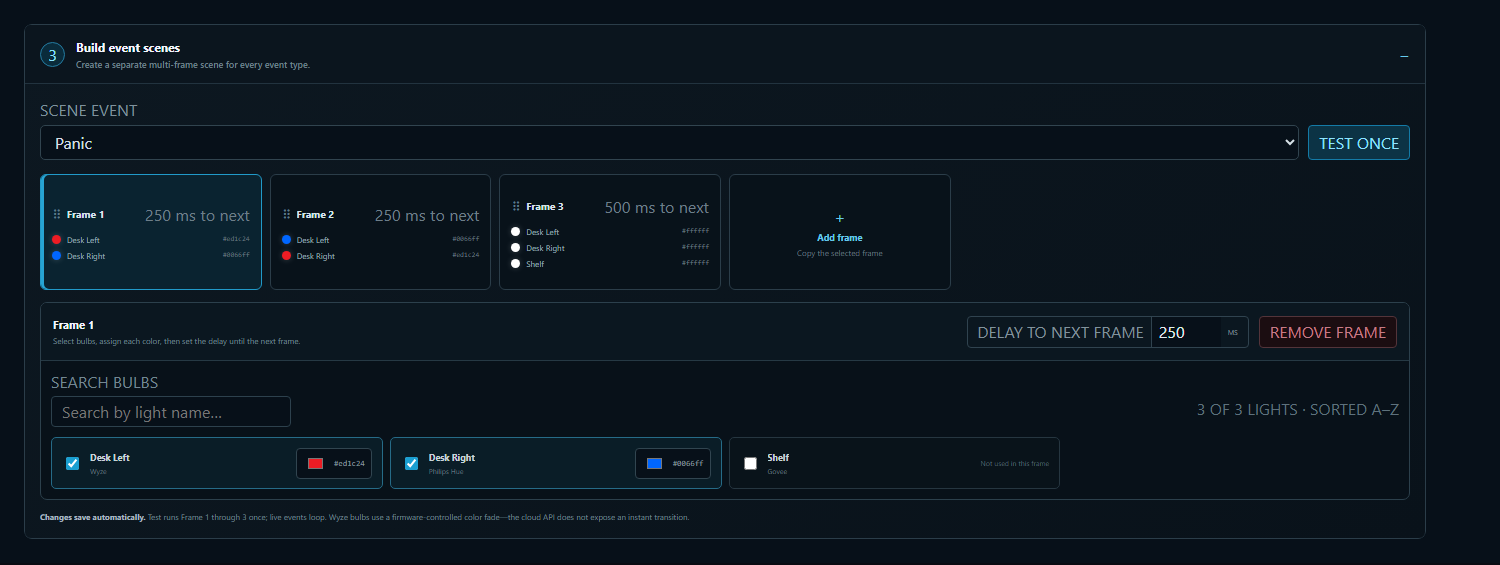 A three-frame panic sequence using different colors and lights in each frame.
Each frame can control a different set of devices. A light, outlet, or Bot not selected in a frame remains unchanged during that frame.
A three-frame panic sequence using different colors and lights in each frame.
Each frame can control a different set of devices. A light, outlet, or Bot not selected in a frame remains unchanged during that frame.
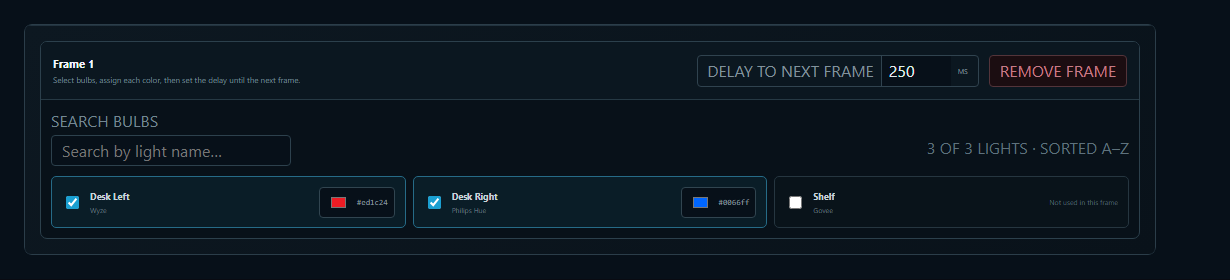 Select the lights and colors for the active frame, then set the time until the next frame.
- Test and save
Changes save automatically on this computer. Select Test once to play Frame 1 through the final frame one time before going live.
When a live game or unit-status state occurs, Studio loops that saved sequence until another state takes over. A gameplay-moment or CAD/Radio widget-event sequence plays once, holding each frame for its configured delay, and then resumes the newest active game or unit-status scene. A newer one-shot event replaces one already playing, while active panic lighting blocks unrelated events. Testing, direct light control, or another sequence cancels the sequence currently playing.
FiveM and LSPDFR Gameplay Moments
FiveM and LSPDFR report the same native-backed gameplay moments. Configure them under FiveM & LSPDFR moments in the scene selector. Each scene is optional and plays once when the transition occurs.
Set each percentage in the Threshold box shown beside the Health threshold event, or under Choose your game > Health event thresholds after selecting FiveM or LSPDFR. The defaults are Drops below 35% and Recovers above 50%. Studio requires the recovery value to be above the lower value, creating a gap that prevents rapid switching near one boundary. These settings apply to both smart-device scenes and Streamer.bot actions.
Player revived deliberately covers both respawns and framework revives. GTA’s entity natives report dead versus alive, but do not identify which recovery flow a server or mod used.
CAD and Radio Widget Events
The Studio desktop app receives these events through the same authenticated realtime connection used by the overlay widgets. Configure any of them under CAD & Radio widget events in the scene selector.
Location-only unit updates do not trigger Status changed > Any status, preventing routine location refreshes from repeatedly interrupting lighting. Any status is a one-shot scene; a named status scene remains active until the unit status changes. Widget-event scenes are optional: an event with no saved frames leaves the current lighting scene unchanged.
Integrated Games
FiveM
FiveM can connect through the latest Sonoran CAD FiveM resource or through the standalone Sonoran Studio resource. The standalone option does not require a CAD community and sends only to the Studio desktop app on the player’s computer.Install the standalone resource
- Download the standalone FiveM resource.
- Extract the ZIP’s
[sonoran_studio]folder directly into the server’sresourcesfolder. - Add
exec @sonoran_studio/sonoran_studio.cfgtoserver.cfg. - Remove any other line that starts
sonoran_studio, includingensure sonoran_studioor an ensured parent folder. Only use theexecline above. - Restart the server and keep the Sonoran Studio desktop app open while playing.
9990. Players using a different local Studio port can run /setstudioport PORT in FiveM.
Automatic resource updates are enabled by default. Run sonoranstudio update in the server console to check immediately. If the resource reports an updater permission, helper, or folder-layout error, reinstall the complete ZIP and confirm that server.cfg uses only the bundled exec line.
FiveM scenes include emergency lights, turn signals, hazards, and the gameplay moments listed above. Sonoran CAD unit statuses, calls, Radio activity, and panic events remain available when the player is also signed into the corresponding Sonoran community.
LSPDFR
The Sonoran Studio LSPDFR plugin synchronizes emergency lights, left and right indicators, hazards, officer details, location, and callout activity through RAGE Plugin Hook. The plugin itself only connects to the Studio desktop app on your computer. When you are signed in, the desktop app sends validated overlay events through your authenticated Studio session.You need LSPDFR, RAGE Plugin Hook, the Sonoran Studio Windows app, and Studio Pro or Sonoran One.
Install the plugin
- Download the LSPDFR integration.
- Close GTA V and RAGE Plugin Hook.
- Extract the ZIP into your Grand Theft Auto V folder. Confirm this file exists:
Grand Theft Auto V\Plugins\SonoranStudio.LSPDFR.dll. - Open RAGE Plugin Hook settings and enable Load all plugins on startup.
- Open the Sonoran Studio Windows app, go to Lighting, and select LSPDFR.
- Start GTA V through RAGE Plugin Hook and launch LSPDFR. Keep Sonoran Studio open while playing.
Supported lighting and overlay data
LSPDFR gameplay moments run the same one-shot scenes as FiveM. Its overlay updates can also run the Status changed, Call attached, Call detached, and Dispatch notification event scenes configured in Studio.
Studio derives the unit status from the LSPDFR callout lifecycle: Available while patrolling, En Route after accepting a callout, On Scene near the callout position, and Unavailable while off duty. LSPDFR does not expose the player’s callsign/unit number, a postal code, or a standard call priority/response code through its native API. These fields remain blank or use your configured widget fallback. Set overlay location precision to Full to show LSPDFR street and area names; Postal only cannot show an LSPDFR location because no postal is available.
Callout packs control the metadata they expose. If a pack omits a friendly name, message, advisory, or position, Studio shows the remaining supported fields without inventing the missing value.
This support uses LSPDFR’s documented callout lifecycle and functions from the official LSPDFR API project. Gameplay moments use GTA entity, weapon, ped, and vehicle natives through RAGE Plugin Hook’s documented native invocation API, cross-checked against the CitizenFX GTA V native documentation. The callout field and handle patterns are also demonstrated by established open-source integrations including External Police Computer, ReportsPlusListener, and FirstResponseGPT.
The plugin sends changes only to
127.0.0.1:9990; it does not connect directly to a game server or expose a public port. If it does not load, open the RAGE Plugin Hook console with F4 and run LoadPlugin "SonoranStudio.LSPDFR.dll", then check RagePluginHook.log for a Sonoran Studio message.